Hyundai Accent: Body (Interior and Exterior) / Front Door
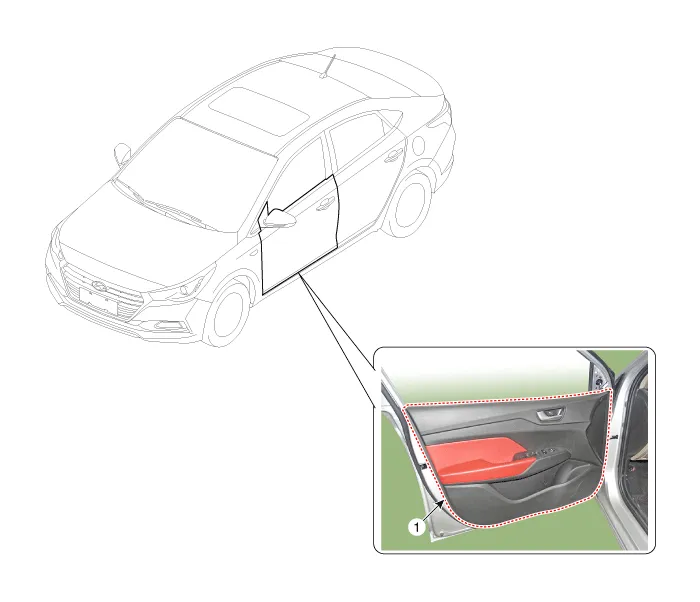
Components and Components Location
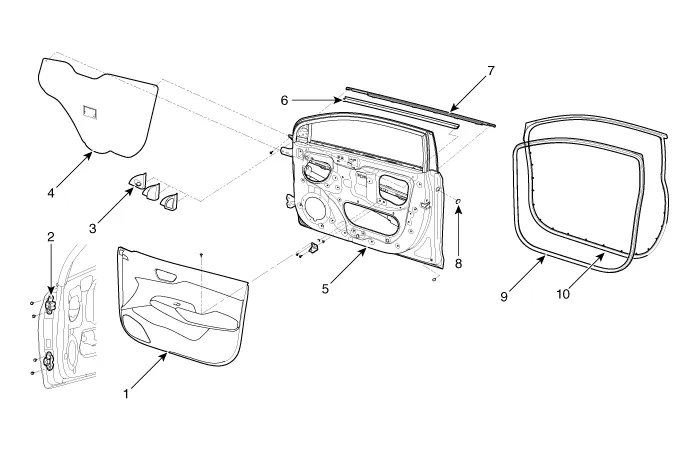
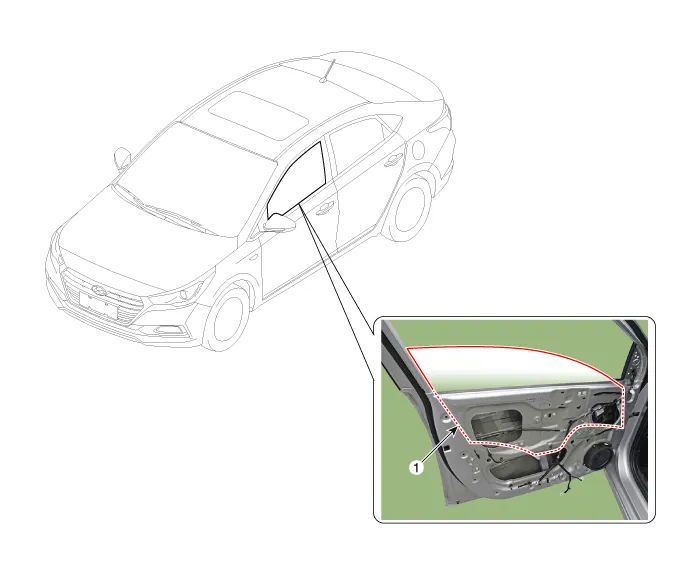
1. Front door trim
2. Front door hinge
3. Front door quadrant inner cover
4. Front door trim seal
5. Front door panel
6. Front door belt inside weatherstrip
7. Front door belt outside weatherstrip
8. Front door hole plug
9. Front door body side weatherstrip
10. Front door door side weatherstrip
Repair procedures

• Check the glass run channel for damage or deterioration, and replace it if necessary.
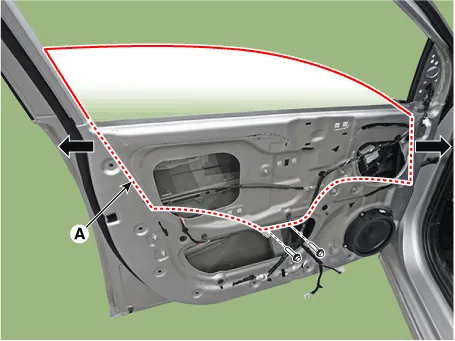
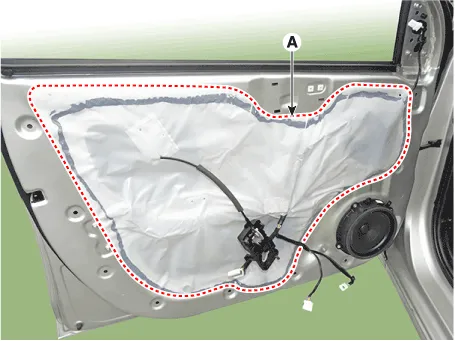
1.Remove the front door trim.(Refer to Front Door - "Front Door Trim")
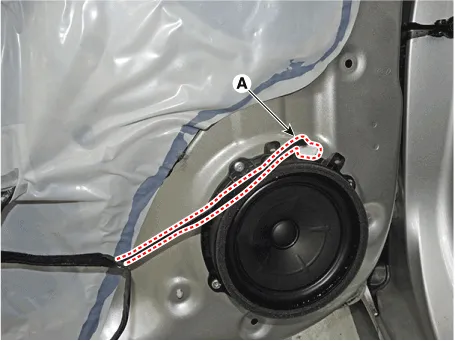
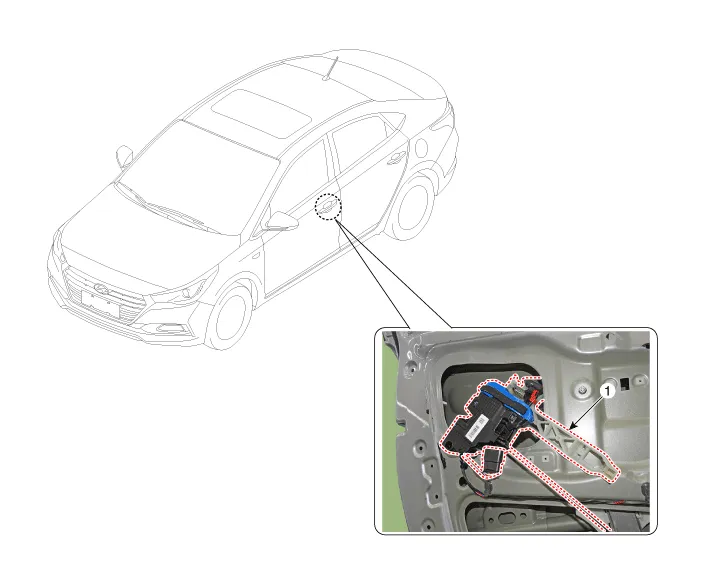
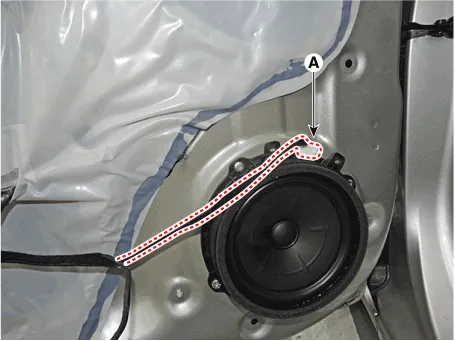
2.Disconnect the front door speaker connector (A).
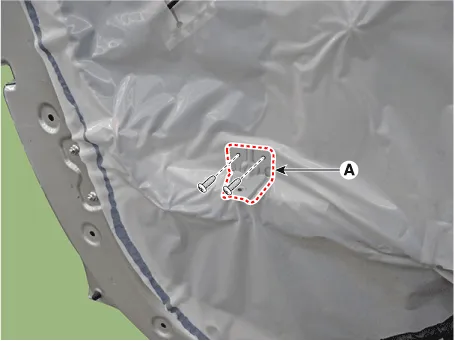
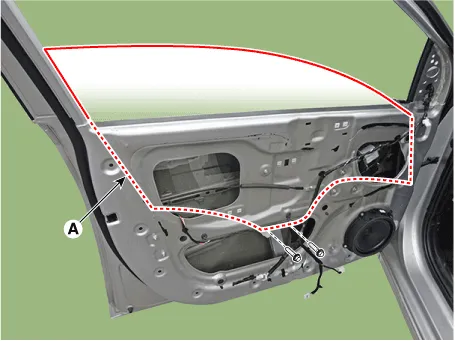
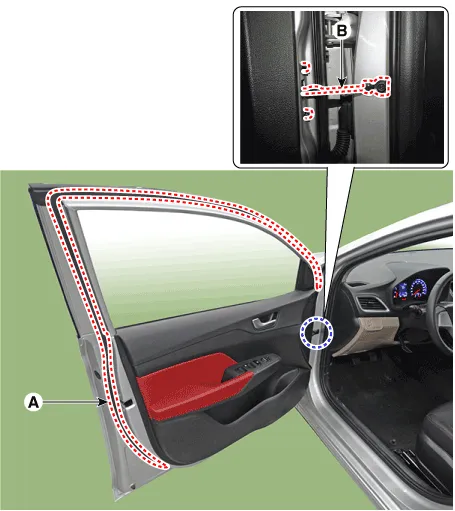
3.After loosening the mounting screws, remove the front door trim seal mounting bracket (A).
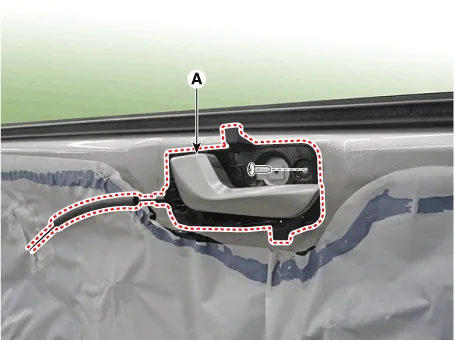
4.After loosening the mounting screws, remove the front door inside handle (A).
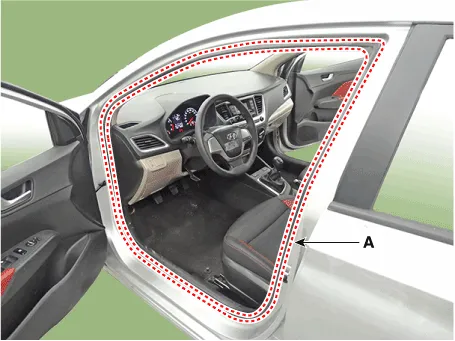
5.Remove the front door trim seal (A).

• Replace any damaged door trim seal.

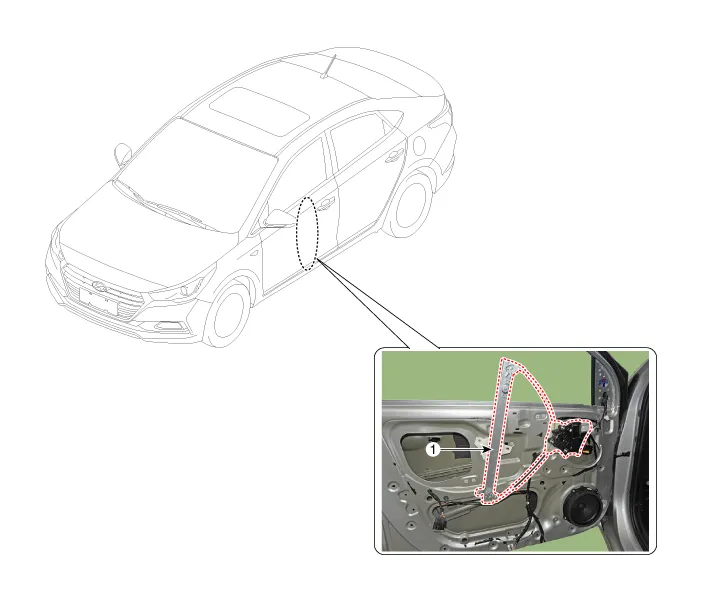
6.After loosening the glass mounting bolts, adjust the spacing of the glass (A) by moving the glass from side to side and then tighten the bolts.
Tightening torque :7.8 - 11.8 N.m (0.8 - 1.2 kgf.m, 5.8 - 8.7 lb-ft)
7.Check the glass for normal operation.

• Make sure the door latches securely without slamming it. If necessary adjust the striker (A): The striker nuts are fixed. The striker can be fine adjusted up or down, and in or out.
1.After loosening the mounting screw, adjust the striker (A) by moving it forward and backward or from side to side and then tighten the bolts (B).
Tightening torque :(B) : 8.8 - 13.7 N.m (0.9 - 1.4 kgf.m, 6.5 - 10.1 lb-ft)
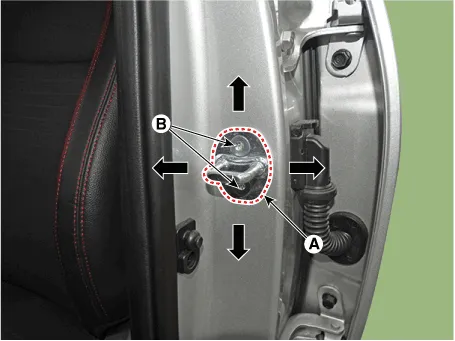
2.Tap on the striker with a plastic hammer to adjust the striker. The striker will not move much, but will give some adjustment.
3.Hold the outer handle out, and push the door against the body to be sure the striker allows a flush fit. If the door latches properly, tighten the screws and recheck.

• After installing the door, check that the body fits flush with/parallel to all the edges of front door. Check that the door and body edges are parallel. Before adjusting, replace the mounting bolts.
1.Check that the door and body edges are parallel.
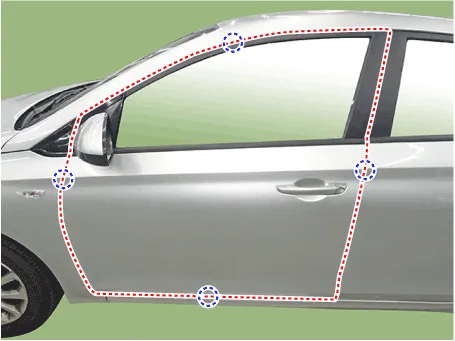
2.Place the vehicle on a level surface before adjusting the doors.
3.Adjust the hinges (A) :
• Loosen the door mounting bolts slightly, and move the door in or out until it flush with the body.
• Loosen the hinge mounting bolts slightly, and move the door backward or forward, up or down as necessary.
• Place a shop towel on the jack to prevent damage to the door when adjusting the door.
Tightening torque :(B) : 22.6 - 27.5 N.m (2.3 - 2.8 kgf.m, 16.2 - 19.9 lb-ft)(C) : 23.6 - 31.9 N.m (2.4 - 3.2 kgf.m, 17.4 - 23.5 lb-ft)
4.Grease the pivot portions of the hinges indicated.
5.Check for water leaks.
Front Door Trim
1. Front door trim

• Put on gloves to prevent hand injuries.

• When removing with a flat - tip screwdriver or remover, wrap protective tape around the tools to prevent damage to components.
• Be careful not to scratch the door trim and other parts.
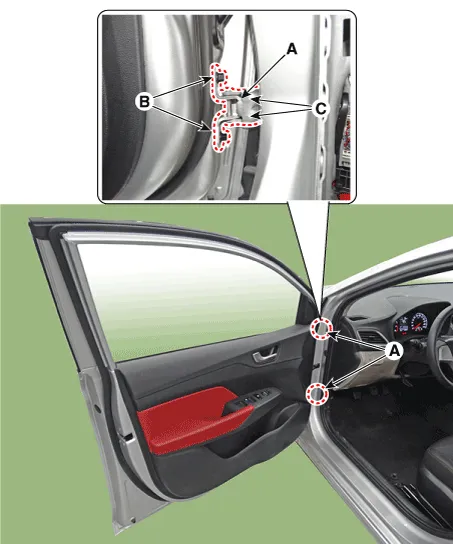
1.Using a screwdriver or remover, remove the front door quadrant inner cover (A).
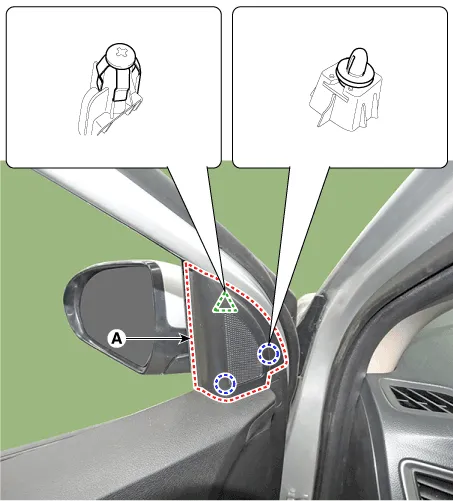
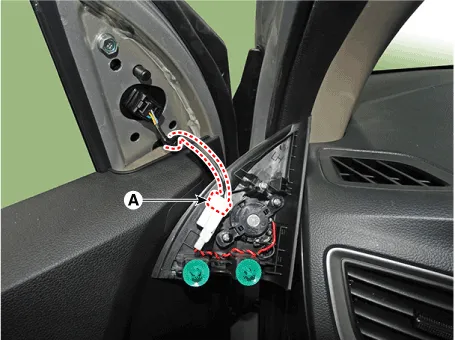
2.Disconnect the tweeter speaker connector (A).
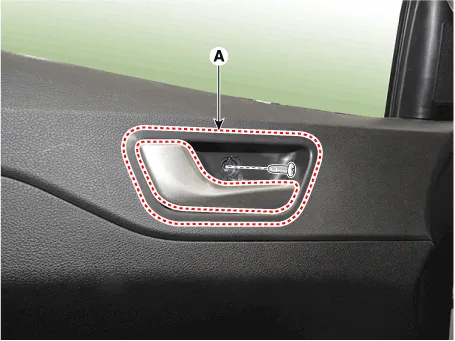
3.After loosening the mounting screws, remove the front door inside handle cover (A).
4.After loosening the mounting screws, remove the lower part of the front door trim (A) using a flat - tip screwdriver.
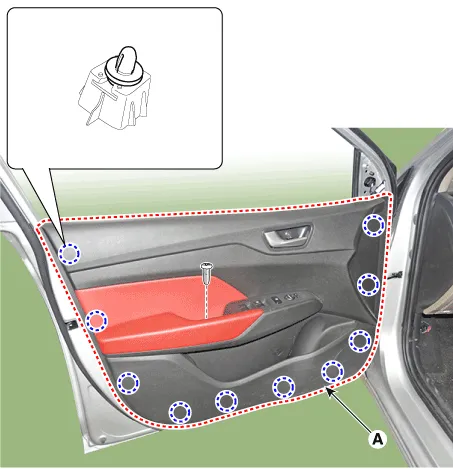
5.Disconnect the front door power window switch connector (A).
6.To install, reverse the removal procedure.

• Make sure the connector is connected properly.
• Make sure the door locks / unlocks and opens / closes properly.
• Replace any damaged clips (or pin - type retainers).
• Make sure the glass is operated properly.
Front Door Inside Handle
1.Remove the front door trim.(Refer to Front Door - "Front Door Trim")
2.After loosening the mounting screws, remove the front door inside handle (A).
3.Disconnect the front door inside handle cable (A).
4.To install, reverse the removal procedure.

• Make sure the door locks / unlocks and opens / closes properly.
• Replace any damaged clips (or pin - type retainers).
Front Door Window Glass
1. Front door window glass
1.Remove the front door trim.(Refer to Front Door - "Front Door Trim")
2.Remove the outside rear view mirror.(Refer to Mirror - "Outside Rear View Mirror ")
3.Disconnect the front door speaker connector (A).

4.After loosening the mounting screws, remove the front door trim seal mounting bracket (A).

5.After loosening the mounting screws, remove the front door inside handle (A).

6.Remove the front door trim seal (A).

• Replace any damaged door trim seal.
7.After loosening the mounting screws, remove the front door belt outside weatherstrip (A).

8.Remove the front door belt inside weatherstrip (A).

9.Lower the glass by operating the power window switch until the glass mounting bolt is exposed in the plug hole.

• Be careful not to drop the glass and/or scratch the glass surface.

• Use the door switch to align the mounting hole / bolt with the hole in the door.
• If unable to operate the window motor, remove the motor and align the hole by hand.
10.After loosening the glass mounting bolts, adjust the spacing of the glass (A) by moving the glass from side to side and then tighten the bolts.
Tightening torque : 7.8 - 11.8 N.m (0.8 - 1.2 kgf.m, 5.8 - 8.7 lb-ft)
11.To install, reverse the removal procedure.

• Roll the glass up and down to see if it moves freely.
• Adjust glass position as needed.
• Make sure the door lock and opens properly.
• Check the glass run channel for damage and replace the damaged channel.
Front Door Power Window Regulator
1. Front door power window regulator
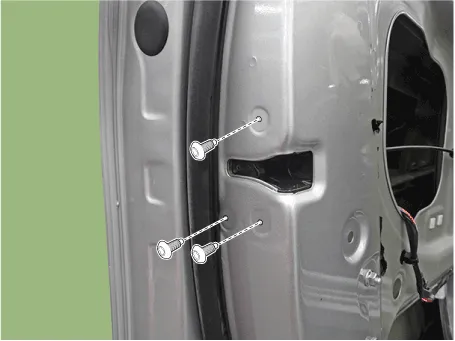
1.Remove the front door window glass.(Refer to Front Door - "Front Door Window Glass")
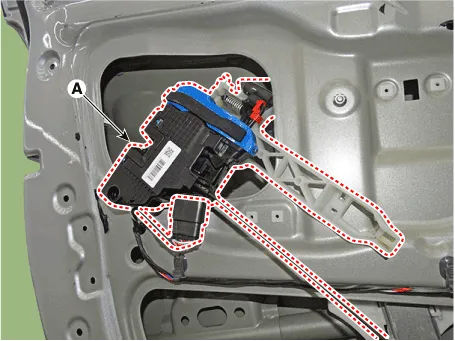
2.Disconnect the front door power window motor connector (A).
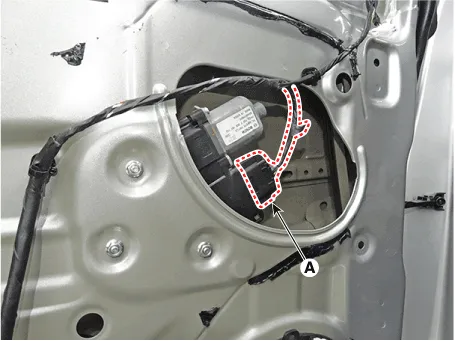
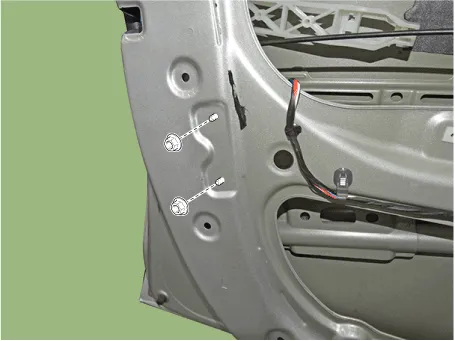
3.Loosen the front door power window regulator mounting nuts.
Tightening torque : 3.9 - 5.9 N.m (0.4 - 0.6 kgf.m, 2.9 - 4.3 lb-ft)

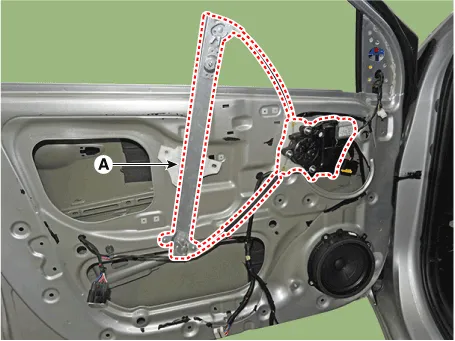
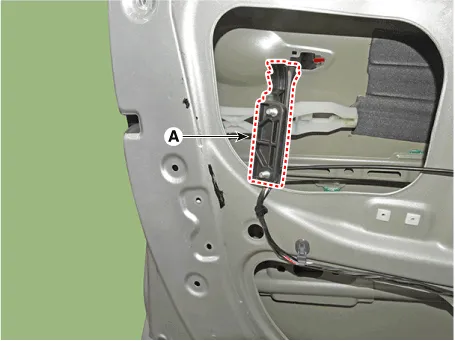
4.Remove the front door power window regulator assembly (A).
5.To install, reverse the removal procedure.

• Make sure connectors are connected properly and each rod is connected securely.
• Make sure the door locks / unlocks and opens / closes properly.
Front Door Outside Handle
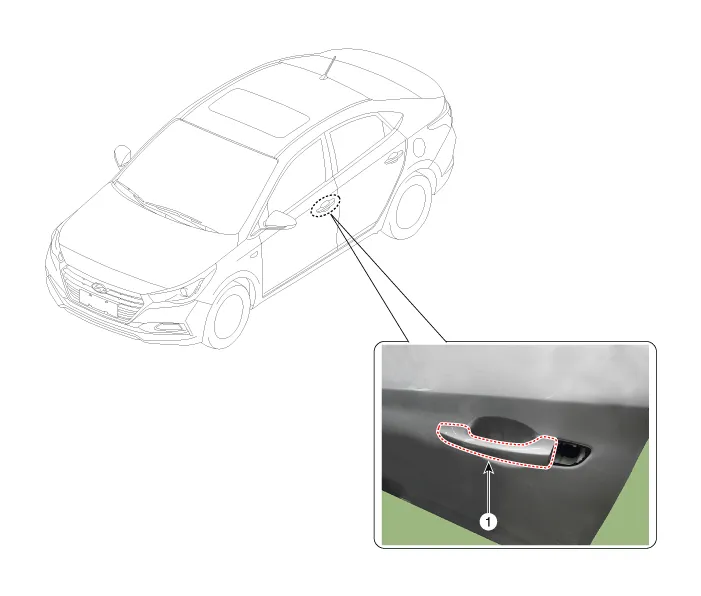
1. Front door outside handle
1.Remove the front door trim.(Refer to Front Door - "Front Door Trim")
2.Disconnect the front door outside handle connector (A).
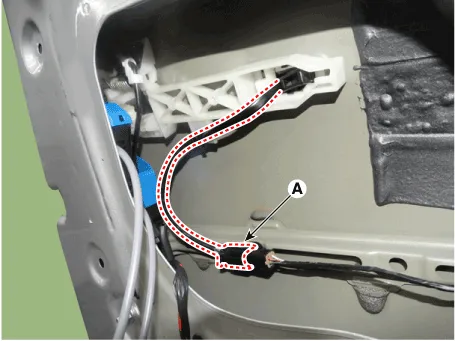
3.Remove the plug hole (B).
4.After loosening the mounting bolt, remove the front door lock assembly (A).
Tightening torque :6.9 - 10.8 N.m (0.7 - 1.1 kgf.m, 5.1 - 8.0 lb-ft)
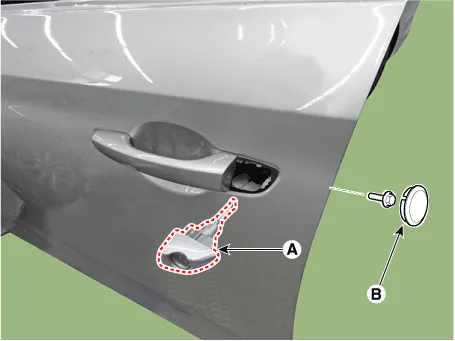
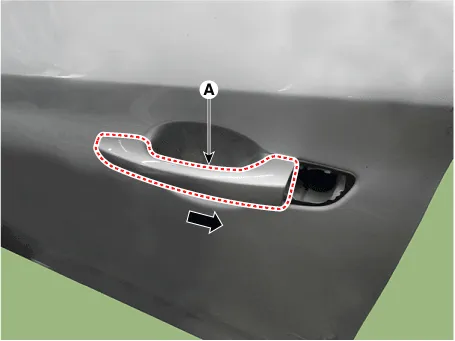
5.Remove the front door outside handle (A) by sliding it forward.
6.To install, reverse the removal procedure.

• Make sure the connector is connected properly.
• Make sure the door locks / unlocks and opens / closes properly.
• Be sure to install the outside handle pad (A) between the outside handle and the door panel.
Front Door Belt Outside Weatherstrip
1.Remove the outside rear view mirror.(Refer to Mirror - "Outside Rear View Mirror")
2.Pull down the front door window glass to the lowest level by pressing the power window glass switch.
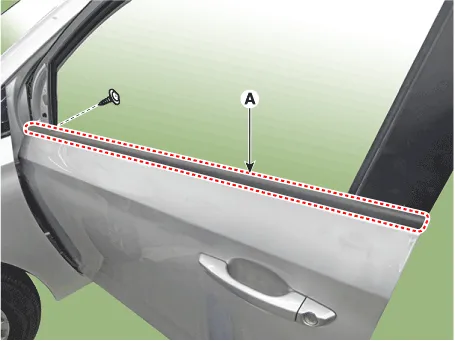
3.After loosening the mounting screws, remove the front door belt outside weatherstrip (A).
Tightening torque :1.0 - 2.0 N.m (0.1 - 0.2 kgf.m, 0.7 - 1.4 lb-ft)
4.To install, reverse the removal procedure.

• Replace any damaged clips (or pin - type retainers).
Front Door Belt Inside Weatherstrip
1.Remove the front door trim.(Refer to Front Door - "Front Door Trim")
2.Remove the front door belt inside weatherstrip (A).

3.To install, reverse the removal procedure.

• When installing, install it by first contacting the inside part (basis point of assembly) of arrow to door frame.
• Replace any damaged clips (or pin - type retainers).
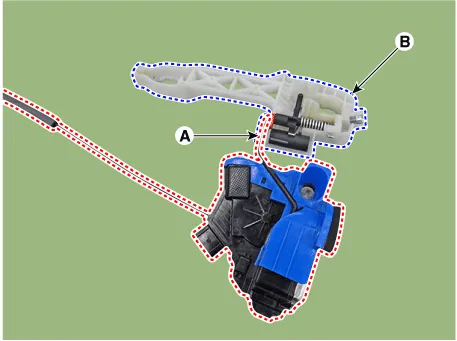
Front Door Side Weatherstrip
[Front door side weatherstrip]
1.Loosen the front door checker (B) mounting bolt.
Tightening torque :21.6 - 32.4 N.m (2.2 - 3.3 kgf.m, 15.9 - 23.9 lb-ft)
2.Detach the clips, then remove the front door side weatherstrip (A).
3.To install, reverse the removal procedure.

• Replace any damaged clips (or pin - type retainers).
[Front door body side weatherstrip]
1.Detach the clips, then remove the front door body side weatherstrip (A).
2.To install, reverse the removal procedure.

• Replace any damaged clips (or pin - type retainers).
Front Door Latch
1. Front door latch
1.Pull up front door window glass by pressing the power window glass switch.
2.Remove the front door trim.(Refer to Front Door - "Front Door Trim")
3.Disconnect the front door speaker connector (A).
4.After loosening the mounting screws, remove the front door trim seal mounting bracket (A).

5.After loosening the mounting screws, remove the front door inside handle (A).
6.Remove the front door trim seal (A).

• Replace any damaged door trim seal.

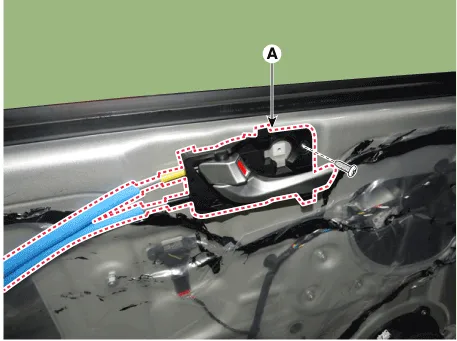
7.Loosen the front door latch (A) mounting screws.
Tightening torque : 7.8 - 10.8 N.m (0.8 - 1.1 kgf.m, 5.8 - 8.0 lb-ft)
8.After loosening the mounting nuts, remove the front door channel lower bracket (A).
Tightening torque : 3.9 - 5.9 N.m (0.4 - 0.6 kgf.m, 2.9 - 4.3 lb-ft)
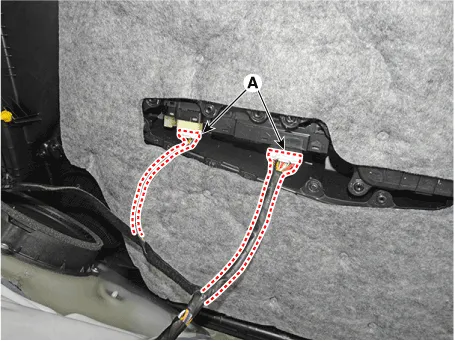
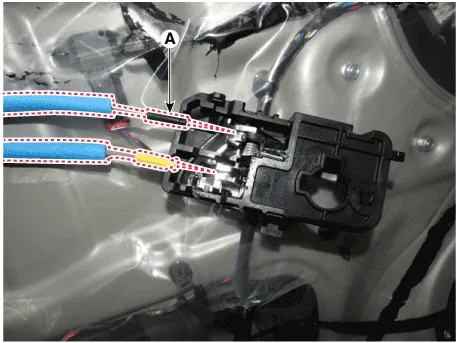
9.Disconnect the front door latch connector (A).
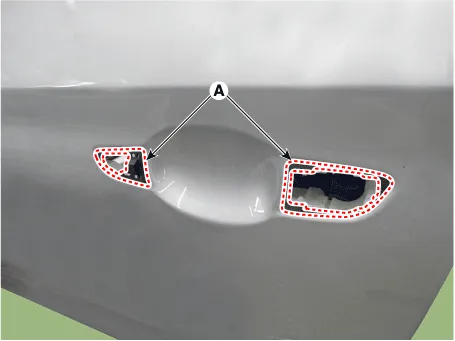
10.After loosening the front door outside handle rod (A), remove the front door outside handle base (B).
11.To install, reverse the removal procedure.

• Make sure the connector is connected properly.
• Make sure the door locks / unlocks and opens / closes properly.
• Replace any damaged clips (or pin - type retainers).


Other information:
Hyundai Accent (HC) (2017 - 2022) Service Manual: Valve Body
- Specifications Indirect Control Solenoid Driven Pulley Control Valve (Secondary_VFS) / Drive Pulley Control Valve (Primary_VFS) / Line Pressure Control Valve (Line_VFS) ItemSpecification Control typeN/H (Normally High) Control pressure kpa (kgf/㎠, psi)0 - 956.14 ± 14.71 (0 - 9.75 ± 0.15, 0 - 138.68 ± 2.13) Current (mA)0 - 1.100 Coil resistance (Ω)5.Hyundai Accent (HC) (2017 - 2022) Service Manual: Ignition Coil
- Specification ItemSpecification Rated Voltage (V)13.5 Operation Voltage (V)6 - 16 ItemSpecification Engine Speed (RPM)100020003000400050006000 Dwell Time (ms)3.43.43.42.92.72.5 Secondary Coil Voltage (kV)40 ↑40 ↑40 ↑40 ↑40 ↑38 ↑ - Description An ignition coil is an induction coil in an engine's ignition system which transforms the battery's low voltage to the high voltage needed to create an electric spark in the spark plugs to ignite the fuel.
Contents
- Components and Components Location
- Repair procedures
- Front Door Trim
- Front Door Inside Handle
- Front Door Window Glass
- Front Door Power Window Regulator
- Front Door Outside Handle
- Front Door Belt Outside Weatherstrip
- Front Door Belt Inside Weatherstrip
- Front Door Side Weatherstrip
- Front Door Latch
Categories
- Manuals Home
- Hyundai Accent Owners Manual
- Hyundai Accent Service Manual
- New on site
- Most important about car