Hyundai Accent: Cylinder Head Assembly / CVVT & Camshaft
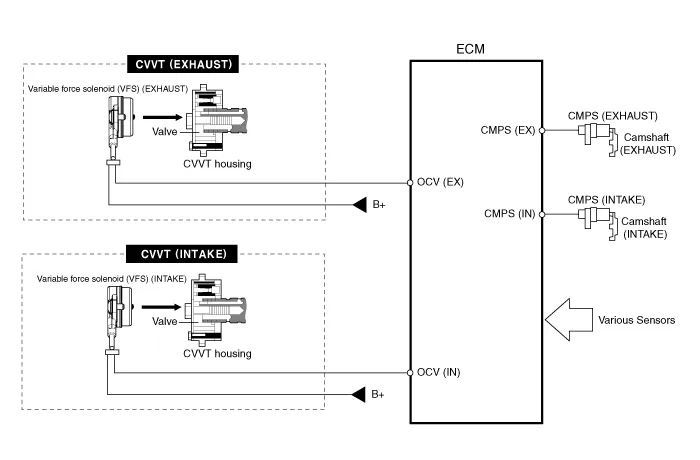
– the CVVT Oil Control Valve (OCV) which supplies the engine oil to the cam phaser or runs out the engine oil from the cam phaser in accordance with the ECM PWM (Pulse With Modulation) control signal,
– and the Cam Phaser which varies the cam phase by using the hydraulic force of the engine oil.
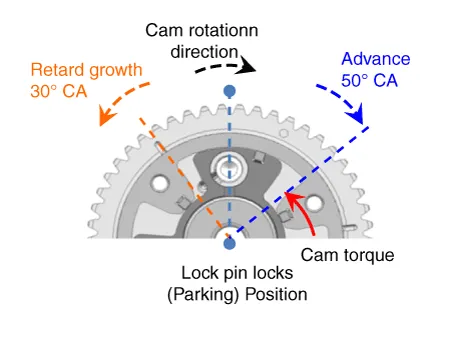
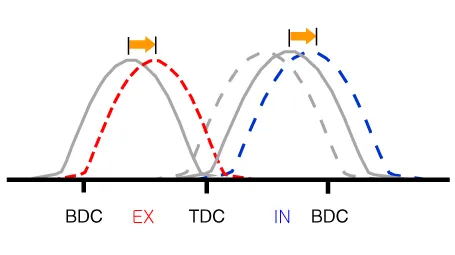
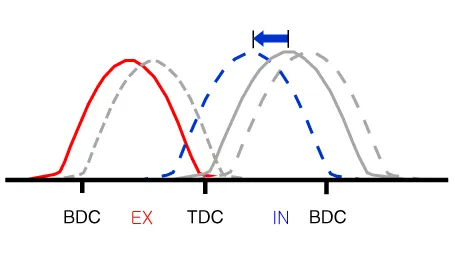
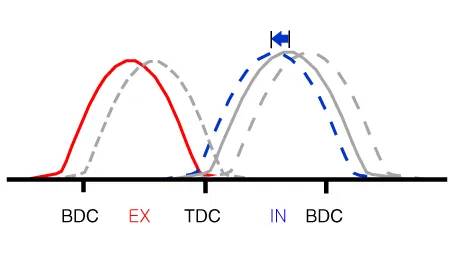
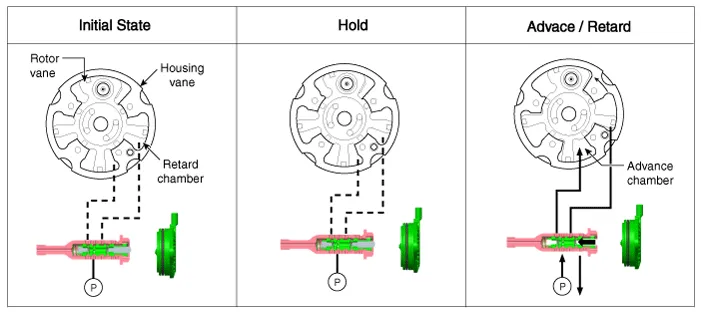
The engine oil getting out of the CVVT oil control valve varies the cam phase in the direction (Intake Advance/Exhaust Retard) or opposite direction (Intake Retard/Exhaust Advance) of the engine rotation by rotating the rotor connected with the camshaft inside the cam phaser.
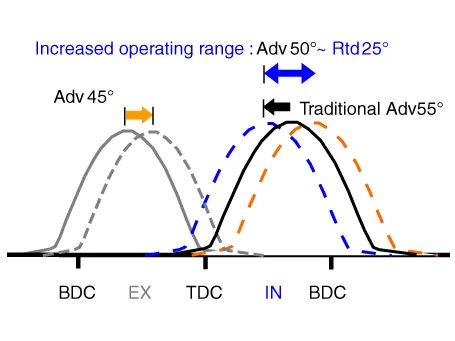
| ▷Effect Improves fuel efficiency by approx. 1%. Expands the intake CVVT operating range. (Increases the retarded amount by up to 30° compared to the default state.) ∇ LIVC (Late Intake Valve Close) ∇ 1. Improves fuel efficiency by reducing pumping loss. 2. Improves knocking characteristics by reducing compression ratio. |
| |
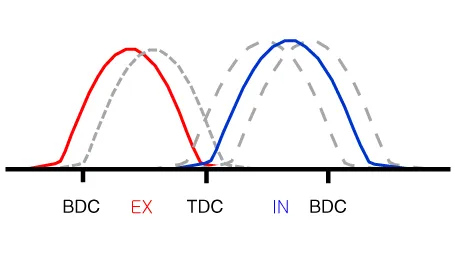
| Default position: Middle CVVT operates in advanced / retarded directions. |

• The variable force solenoid (VFS) changes its force depending on the PWM duty to control the stroke of the OCV.
• It also controls the lock, unlock, advanced, retarded, and holding functions.
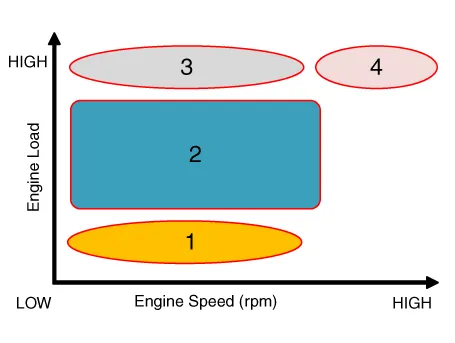
| (1) Low Speed / Low Load | (2) Part Load |
|
|
| (3) Low Speed / High Load | (4) High Speed / High Load |
|
|
| Driving Condition | Exhaust Valve | Intake Valve | ||
| Valve Timing | Effect | Valve Timing | Effect | |
| (1) Low Speed /Low Load | Completely Advance | * Valve Under-lap * Improvement of combustion stability | Completely Retard | * Valve Under-lap * Improvement of combustion stability |
| (2) Part Load | Retard | * Increase of expansion work * Reduction of pumping loss * Reduction of HC | Retard | * Reduction of pumping loss |
| (3) Low Speed /High Load | Retard | * Increase of expansion work | Advance | * Prevention of intake back flow (Improvement of volumetric efficiency) |
| (4) High Speed /High Load | Advance | * Reduction of pumping loss | Retard | * Improvement of volumetric efficiency |
1.Disconnect the battery negative terminal.
2.Remove the cylinder head cover. (Refer to Cylinder Head Assembly - "Cylinder Head Cover")
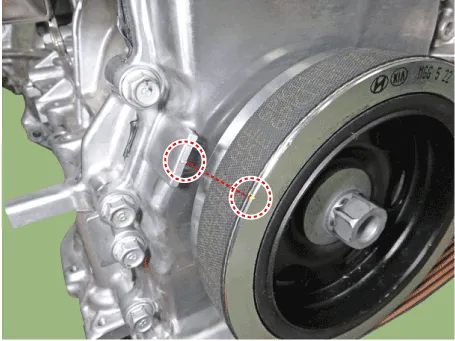
3.Turn the crankshaft damper pulley so that No. 1 piston is at top dead center.
(1)Turn the crankshaft damper pulley and align its groove with the timing mark on the timing chain cover
(2)Check that the timing mark of the intake CVVT and exhaust CVVT is
above.If not, turn the crankshaft damper pulley by one revolution
(360°).
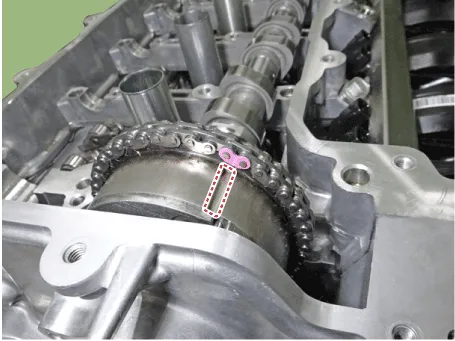
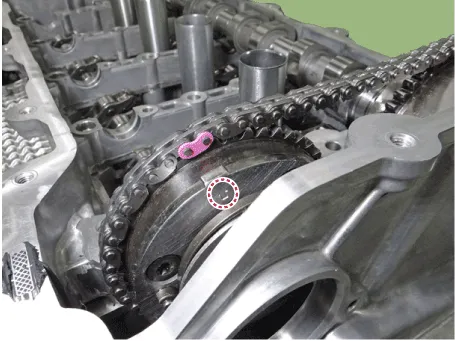
4.Mark the timing chain links corresponding to the timing marks on the intake and exhaust CVVT with a indelible marker.
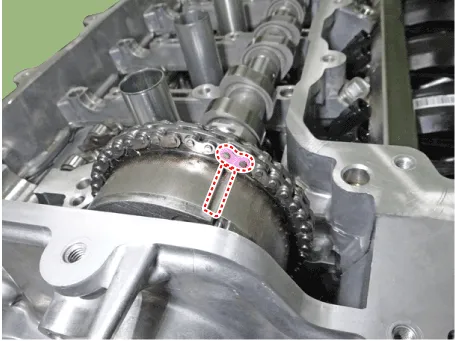
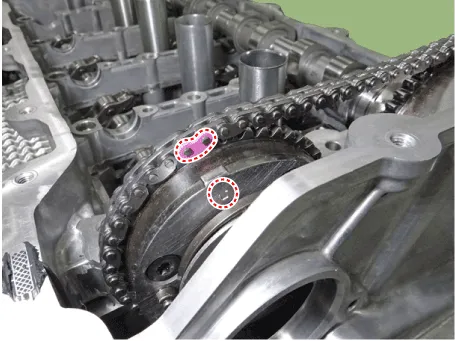
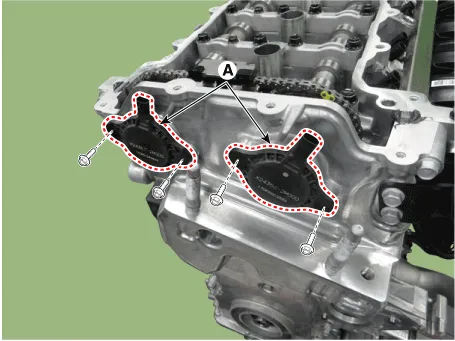
5.Remove the intake and exhaust variable force solenoid (VFS) valves (A).
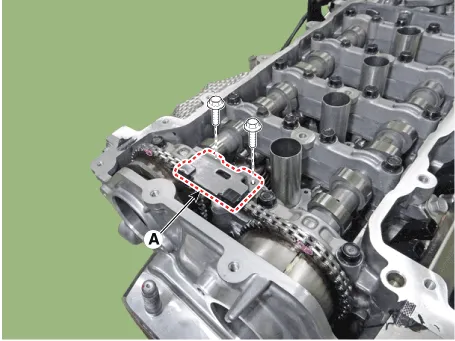
6.Remove the cam to cam guide (A).
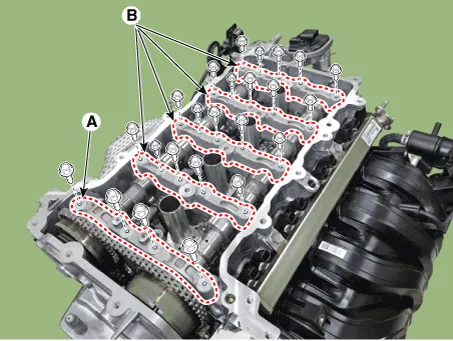
7.Remove the camshaft front bearing cap (A) and camshaft bearing caps (B).
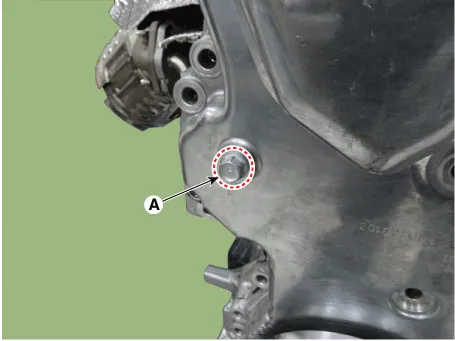
8.Loosen the service hole bolt (A).
9.Install the jack to the edge of oil pan
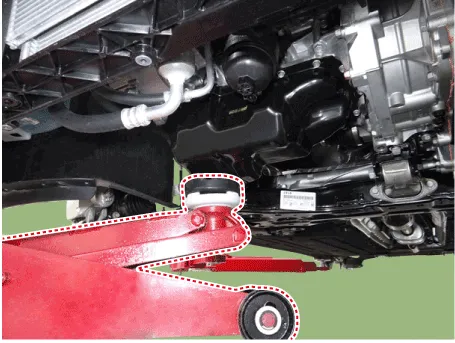

• Insert the rubber block between jack and oil pan.
10.Remove the engine mounting support bracket.(Refer to Engine and Transaxle Assembly - "Engine Mounting")
11.Lift the engine using the jack to obtain space.
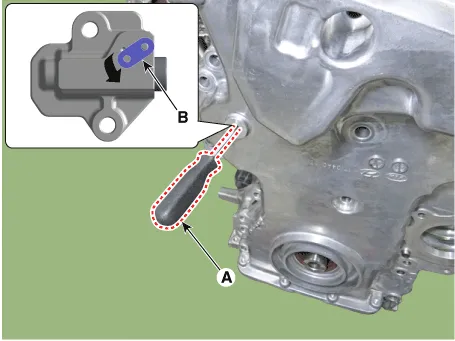
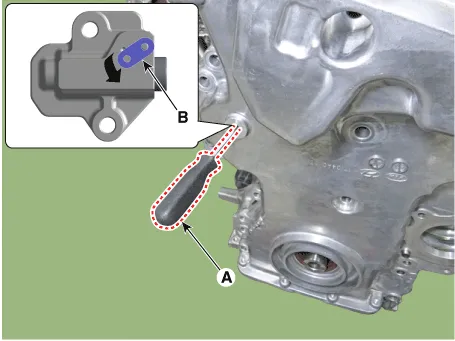
12.Release the lock by putting down rachet plate (B) of timing chain tensioner with using back of tiny awl (A).
13.Remove the exhaust oil control valve (OCV) and center bolt (A).
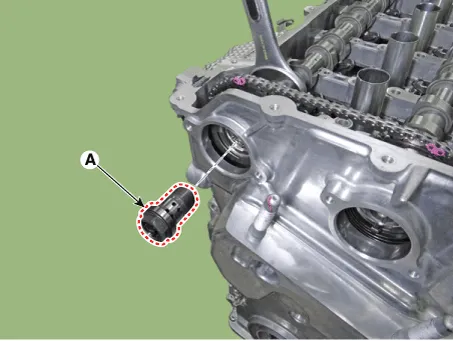

• To prevent impurities from entering exhaust oil control valve (OCV) & center bolt, wear rubber gloves.
• When removing the exhaust oil control valve (OCV) and center bolt, hold the hexagonal portion (A) on the camshaft with a wrench to prevent the camshaft from rotating.
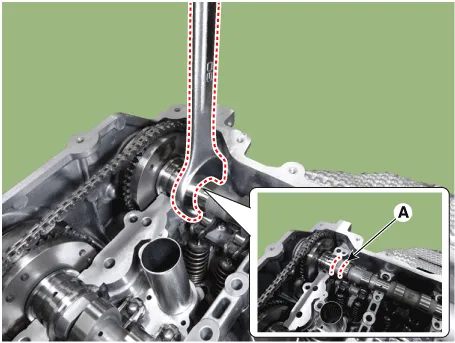
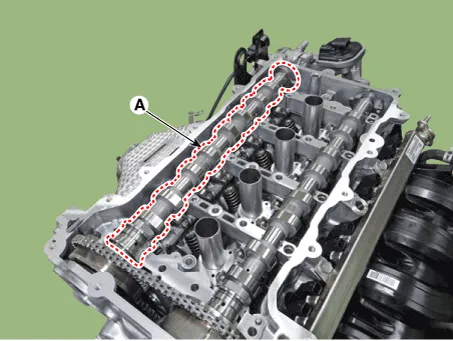
14.Remove the exhaust camshaft (A).
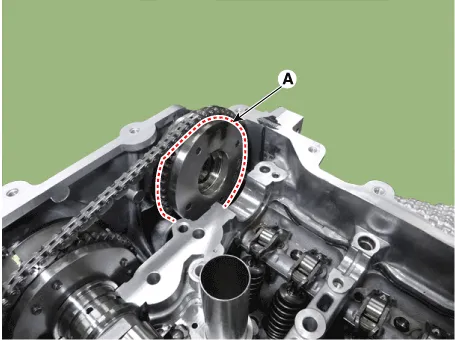
15.Remove the exhaust CVVT (A) from the timing chain.
16.Remove the intake oil control valve (OCV) and center bolt (A).
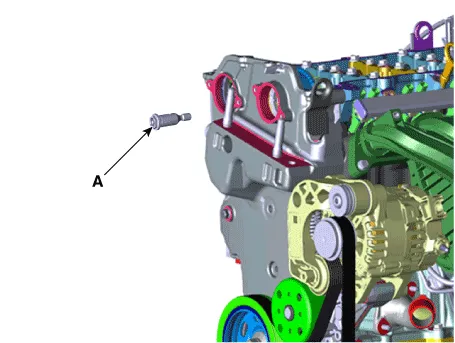

• To prevent impurities from entering intake oil control valve (OCV) & center bolt, wear rubber gloves.
• When removing the exhaust oil control valve (OCV) and center bolt, hold the hexagonal portion (A) on the camshaft with a wrench to prevent the camshaft from rotating.
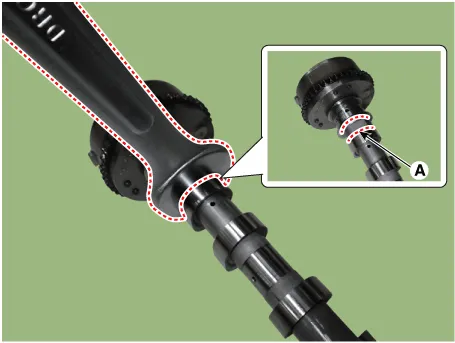
17.Remove the intake camshaftr (A) and than remove the intake CVVT (B).
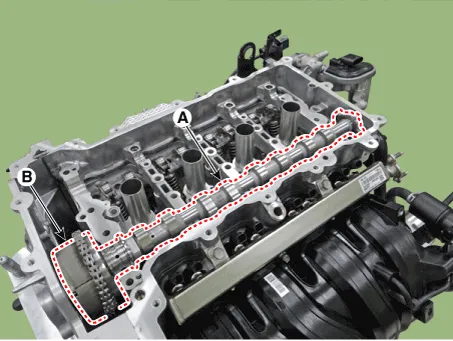

• Fasten the timing chain to the engine hanger with a cable tie or strap not to allow the timing chain to fall down when removing the intake and exhaust CVVT & camshaft.
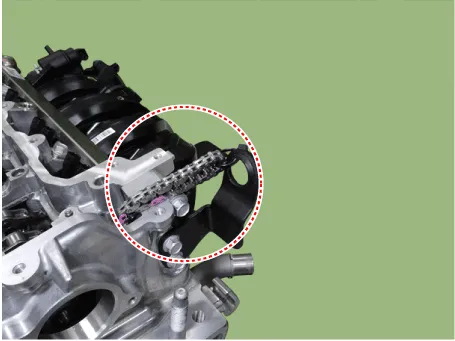
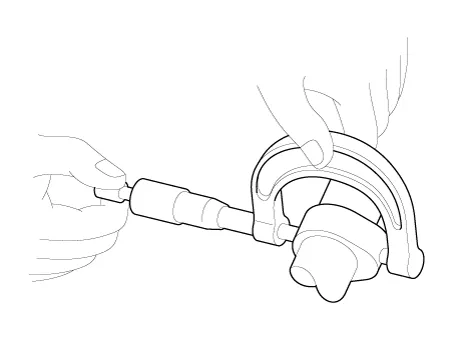
1.Measure the height of the cam.Check the surface of the cam lob for wear and tear. If necessary, replace the camshaft.
Cam heightIntake : 38.13 mm (1.501 in.)Exhaust : 37.44 mm (1.474 in.)
2.Inspect the camshaft journal clearance.
(1)Clean the camshaft journals and bearing caps.
(2)Place the camshafts on the cam carrier.
(3)Lay a strip of plasticgauge across each of the camshaft journals.
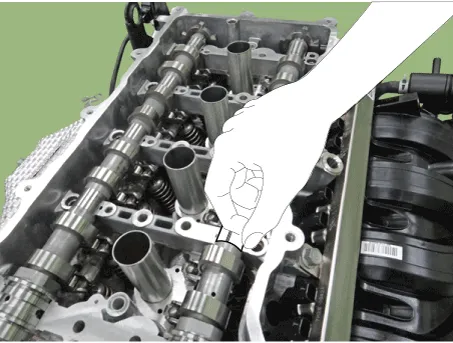
(4)Install the camshaft front bearing cap and camshaft bearing caps.
(1)Install the camshaft front bearing cap (A) and camshaft bearing caps (B).
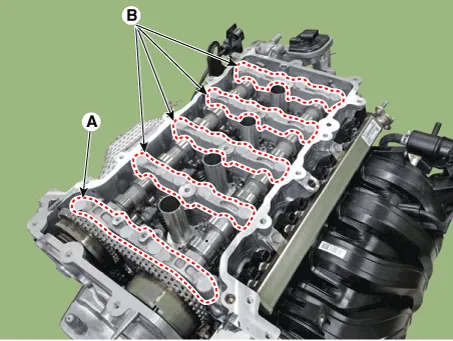
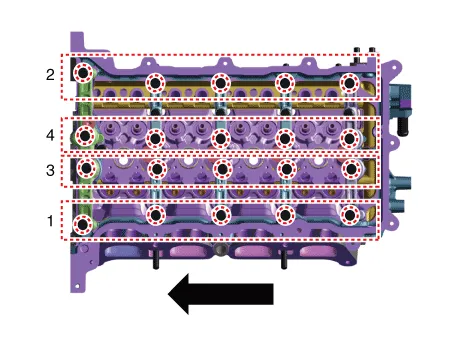
(2)Install the camshaft front bearing cap and camshaft bearing cap installing bolt with direction from back of engine to the front of engine according to the procedure at down below.
Tightening torque :1 STEP : 4.9 - 6.9 N.m (0.5 - 0.7 kgf.m, 3.6 - 5.1 lb-ft)2 STEP : 18.6 - 22.6 N.m (1.9 - 2.3 kgf.m, 13.7 - 16.6 lb-ft)
(5)Remove the camshaft bearing caps.
(6)Measure the plasticgauge at the widest point.If the oil clearance is greater than the specification, replace the camshaft. If necessary, replace the bearing caps and cam carrier.
Camshaft cap oil clearance[Standard value]No.1 journal : 0.045 - 0.076 mm (0.0018 - 0.0030 in.)No.2,3,4 journal : 0.035 - 0.066 mm (0.0014 - 0.0026 in.)
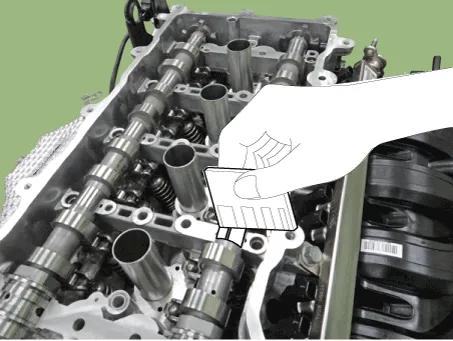
(7)Remove the plasticgauge.
(8)Remove the camshafts.
3.Inspect the camshaft end play.When checking the camshaft end play, remove the timing chain and the intake and exhaust CVVT.
(1)Install the camshafts.
(2)Measure the end play while moving the camshaft back and forth using a dial gauge.
Camshaft end playStandard value : 0.10 - 0.19 mm (0.0039 - 0.0075 in.)
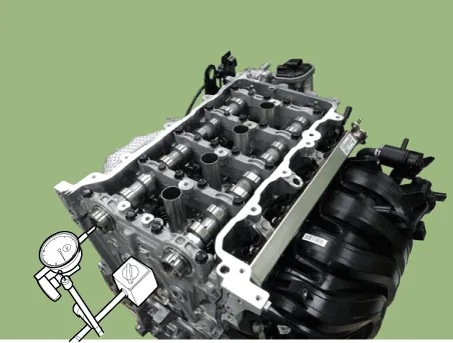
1.Install the intake camshaft (A) and intake CVVT (B).
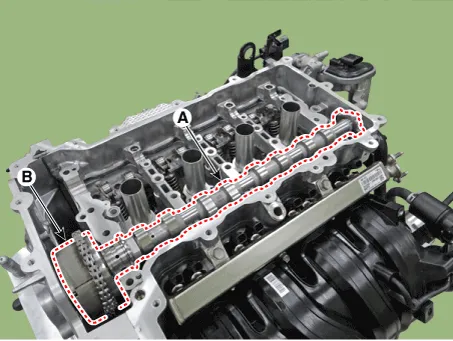

• When installing the intake camshaft, spray the engine oil to the camshaft journal installing part (A) of the cam carrier.The amount of application should be enough to flow down both the front and back sides when it is applied to the center.
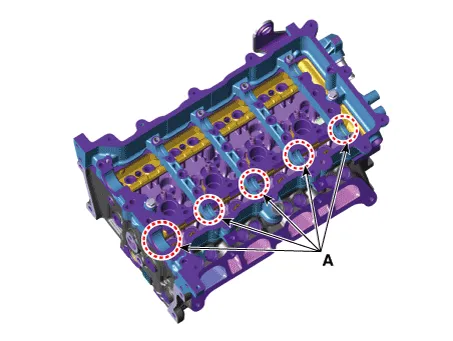
• For installation, the timing mark of the intake CVVT and the timing chain mark should be matched.
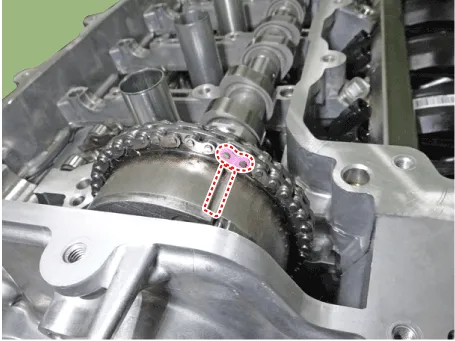
2.Install the intake oil control valve (OCV) and center bolt (A).
Tightening torque : 27.5 - 31.4 N.m (2.8 - 3.2 kgf.m, 20.3 - 23.1 lb-ft) + 38 - 42°
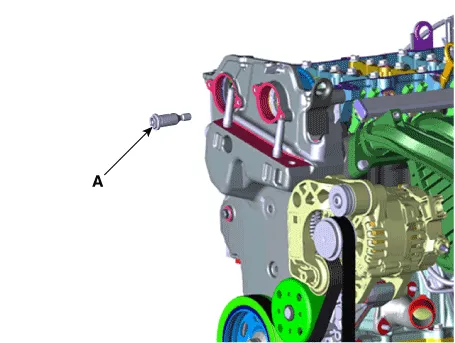

• To prevent impurities from entering intake oil control valve (OCV) & center bolt, wear rubber gloves.
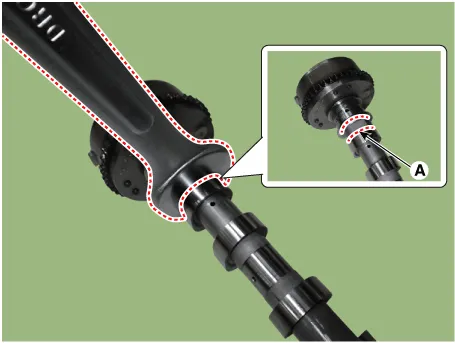
• When installing the intake oil control valve (OCV) and center bolt, hold the hexagonal portion (A) on the camshaft with a wrench to prevent the camshaft from rotating.
3.Compress the timing chain tensioner piston.
(1)With a pry bar (A), compress the timing chain tensioner piston (B).
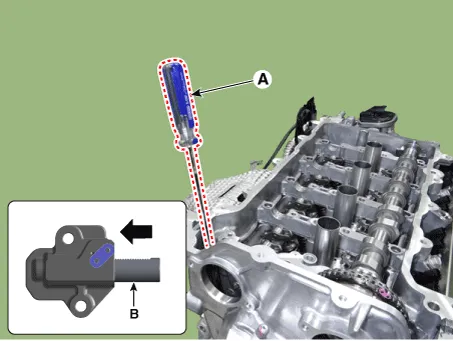
(2)With a thin gimlet (A), raise the ratchet plate (B) of the timing chain tensioner and fix the piston.
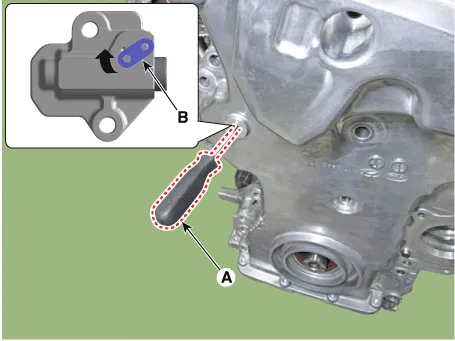

• Do not remove the pick (A).
4.Install the exhaust CVVT (A).
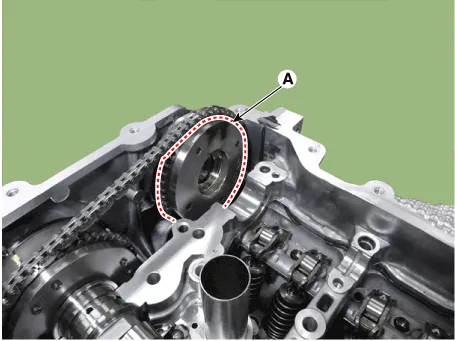

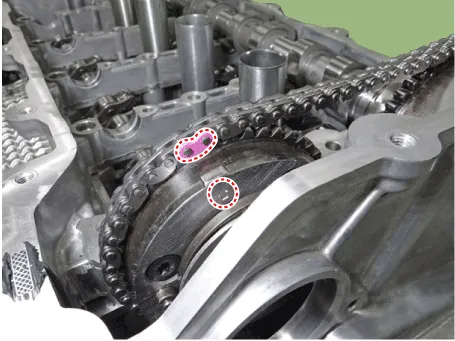
• For installation, the timing mark of the exhaust CVVT and the timing chain mark should be matched.
5.Install the exhaust camshaft (A).
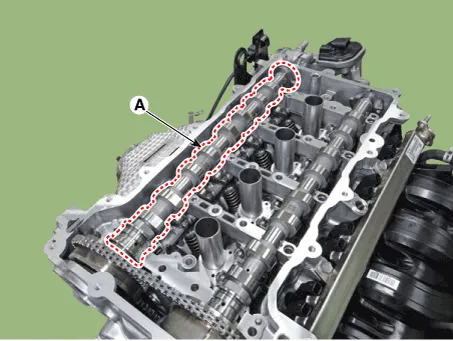

• When installing the exhaust camshaft, spray the engine oil to the camshaft journal installing part (A) of the cam carrier.The amount of application should be enough to flow down both the front and back sides when it is applied to the center..
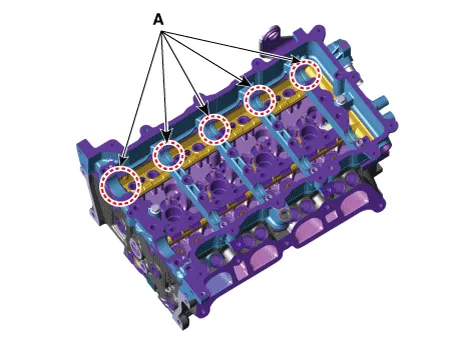
6.Install the exhaust oil control valve (OCV) and center bolt (A).
Tightening torque : 22.6 - 26.5 N.m (2.3 - 2.7 kgf.m, 16.6 - 19.5 lb-ft) + 32 - 46°
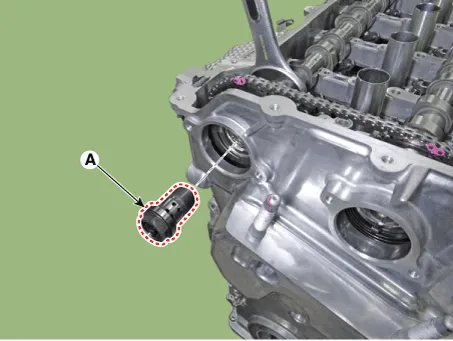

• To prevent impurities from entering exhaust oil control valve (OCV) & center bolt, wear rubber gloves.
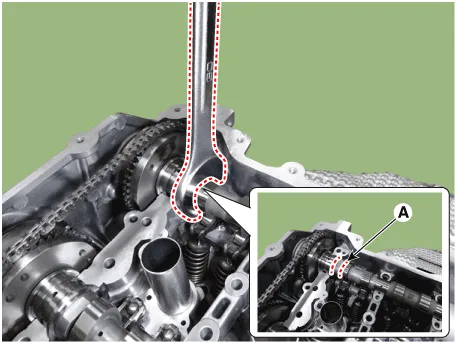
• When installing the exhaust oil control valve (OCV) and center bolt, hold the hexagonal portion (A) on the camshaft with a wrench to prevent the camshaft from rotating.
7.Install the camshaft front bearing cap and camshaft bearing caps.

• If there is enough engine oil on the camshaft front bearing cap and camshaft bearing cap installing bolt and bolt hole, tighten to the minimum required tightening torque.
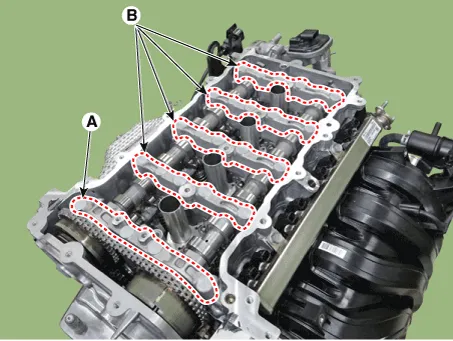
• Apply engine oil the upper part of the intake / exhaust camshaft journal, then install the camshaft front bearing cap and camshaft bearing cap. The amount of application should be enough to flow down both the front and back sides when it is applied to the center.
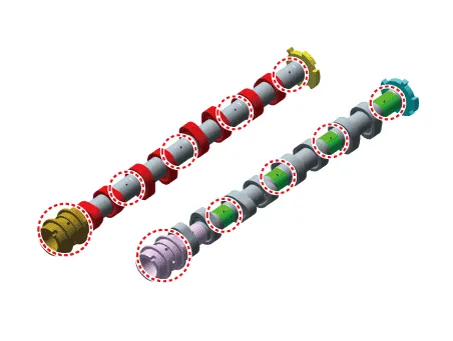
• When installing camshaft front bearing cap and camshaft bearing cap, a stable installation of a dowel pin (A) and a knock bushing (b) to the installing part of the bearing cap requires proper leveling.
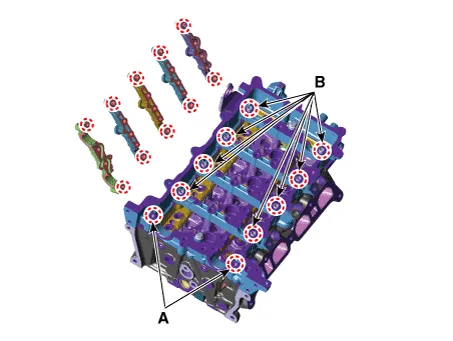
(1)Install the camshaft front bearing cap (A) and camshaft bearing caps (B).
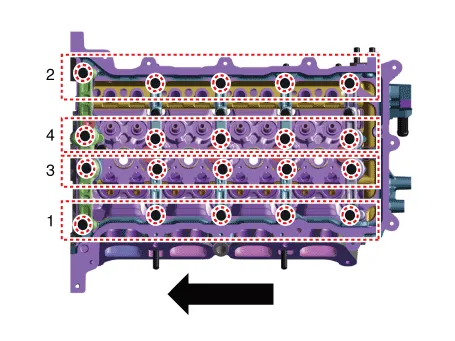
(2)Install the camshaft front bearing cap and camshaft bearing cap installing bolt with direction from back of engine to the front of engine according to the procedure at down below.
Tightening torque :1 STEP : 4.9 - 6.9 N.m (0.5 - 0.7 kgf.m, 3.6 - 5.1 lb-ft)2 STEP : 18.6 - 22.6 N.m (1.9 - 2.3 kgf.m, 13.7 - 16.6 lb-ft)
8.Remove the fine gimlets (A) that hold the timing chain tensioner.
9.Check whether the sprockets' timing marks of the intake and
exhaust CVVT are matched with the timing marks (color link) on the
timing chain.
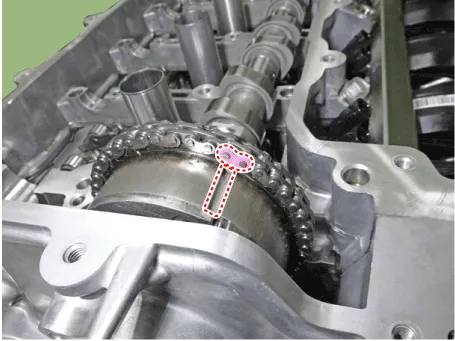
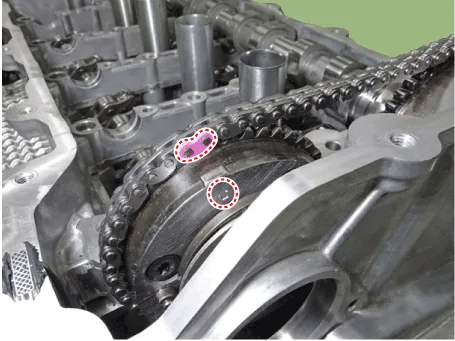
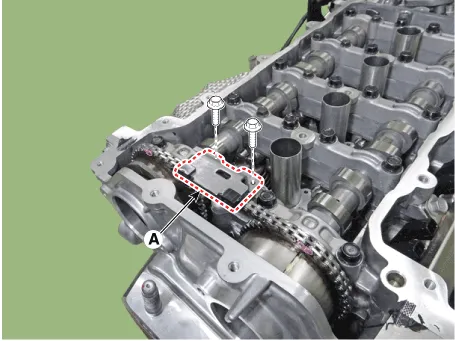
10.Install the cam to cam guide (A).
Tightening torque : 9.8 - 11.8 N.m (1.0 - 1.2 kgf.m, 7.2 - 8.7 lb-ft)
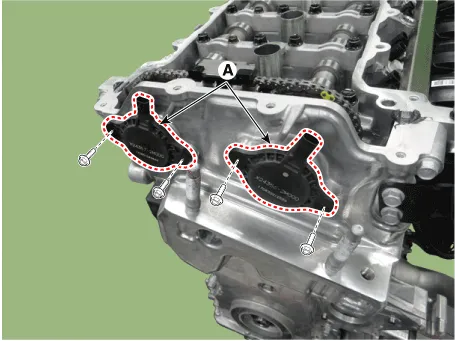
11.Install the intake and exhaust variable force solenoid (VFS) valves (A).
Tightening torque :9.8 - 11.8 N.m (1.0 - 1.2 kgf.m, 7.2 - 8.7 lb-ft)
12.Install the cylinder head cover.(Refer to Cylinder Head Assembly - "Cylinder Head Cover")
Other information:
Hyundai Accent (HC) (2017 - 2022) Service Manual: Specifications
- Specification EngineTransaxleJoint type Max. permissible angle OuterInnerOuterInner GAMMA 1.6AT / MTBJ#22TJi#2246.5°23° - Tightening torque Item N.mkgf.mlb-ft FrontHub nuts107.9 - 127.511.0 - 13.079.6 - 94.0 Driveshaft caulking nut274.6 - 294.228.0 - 30.0202.5 - 217.0 Strut assembly to knuckle98.1 - 117.710.0 - 12.072.3 - 86.8 Front caliper to knuckle78.Hyundai Accent (HC) (2017 - 2022) Service Manual: Heated Oxygen Sensor (HO2S)
- Description Heated Oxygen Sensor (HO2S) consists of zirconium and alumina and is installed on upstream and downstream of the Warm up Catalytic Converter (WCC).After it compares oxygen consistency of the atmosphere with the exhaust gas, it transfers the corresponding voltage signal to the ECM.In order that this sensor normally operates, the temperature of the sensor tip must be higher than predetermined temperature.
Categories
- Manuals Home
- Hyundai Accent Owners Manual
- Hyundai Accent Service Manual
- New on site
- Most important about car

