Hyundai Accent: Engine Mechanical System
Specifications ➤
Repair procedures

• If the there is lack of power, excessive oil consumption or poor fuel economy, measure the compression pressure.
1.Start the engine and turn the coolant temperature to 80 - 95 °C and stop.
2.Remove the engine cover.(Refer to Engine and Transaxle Assembly - "Engine Cover")
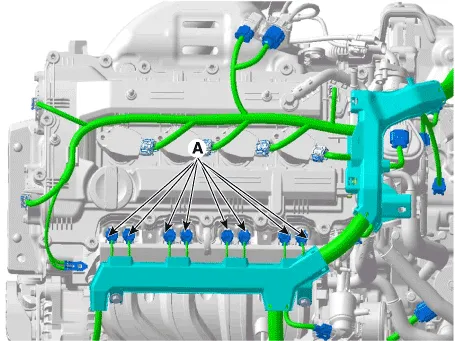
3.Disconnect the injector connectors (A).
4.Remove the ignition coils.(Refer to Engine Electical System - "Ignition Coil")
5.Remove spark plugs.(Refer to Engine Electrical System - "Spark Plug")
6.Check the cylinder compression pressure.
(1)Insert a compression gauge into the spark plug hole.
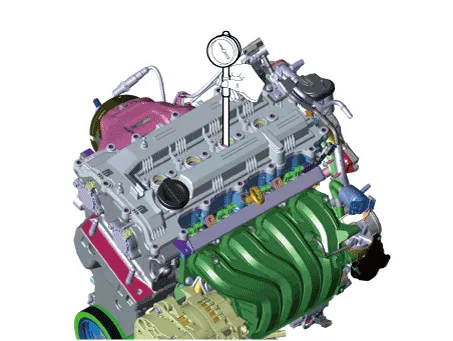
(2)Fully open the throttle valve.
(3)While cranking the engine, measure the compression pressure.

• Always use a fully charged battery to obtain engine speed of 200 rpm or more.
(4)Repeat steps (1) through (3) for each cylinder.

• If you need to check the compression pressure for more than three times, restart the engine to restore the lubrication condition to be normal and then check the compression pressure again.
Compression pressureStandard : 1225.83kPa (12.5kg/cm, 177.79psi) (200-250 rpm)Minimum : 1078.73kPa (11.0kg/cm, 156.46psi)Difference between each cylinder : 98 kPa (1.0 kg/cm, 14 psi) or less
(5)If the cylinder compression in 1 or more cylinders is low, pour a small amount of engine oil into the cylinder through the spark plug hole and repeat steps (1) through (3) for cylinders with low compression.
• If adding oil helps the compression, it is likely that the piston rings and/or cylinder bore are worn or damaged.
• If pressure stays low, a valve may be sticking or seating is improper, or there may be leakage past the gasket.
7.Install the spark plugs.(Refer to Engine Electrical System - "Spark Plug")
8.Install the ignition coil.(Refer to Engine Electical System - "Ignition Coil")
9.Connect the injector connectors (A).

10.Some DTCs may exist after the inspection test and may need to be manually cleared with GDS.
11.Install the engine cover.(Refer to Engine and Transaxle Assembly - "Engine Cover")
Troubleshooting ➤
Special Service Tools
| Tool (Number and name) | Illustration | Use |
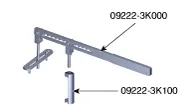
| Valve spring compressor (09222-3K000) Valve spring compressor adapter (09222-3K100) |
| Removal and installation of the intake / exhaust valve spring and retainer lock |
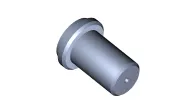
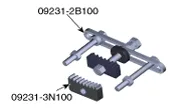
| Valve stem seal installer (09222-2B100) |
| Installation of the valve stem seal |
| Oil pan remover (09215-3C000) |
| Removal of oil pan |
| Crankshaft front oil seal installer (0K231-2C200) |
| Installation of the crankshaft front oil seal |
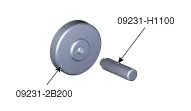
| Crankshaft rear oil seal installer (09231-2B200) Handle (09231-H1100) |
| Installation of the crankshaft rear oil seal |
| Ring gear stopper (09231-3N100) |
| Removal and installation of crankshaft damper pulley bolt |


Engine And Transaxle Assembly ➤
Timing System ➤
Cylinder Head Assembly ➤
Cylinder Block ➤
Cooling System ➤
Lubrication System ➤
Intake And Exhaust System ➤


Other information:
Hyundai Accent (HC) (2017 - 2022) Service Manual: Audio Unit
- Components [Bluetooth + Blue Link + SXM] Connector Pin Information NoConnector AConnector BConnector C 1Left rear door speaker (+)-B_CAN (HI) 2Left rear door speaker (-)Mic signal (+)C_CAN (HI)-bluelink only 3--- 4--- 5-Antenna power - 6Cameara powerIllumination (+)- 7Camera videoMM CAN (High)- 8--B_CAN (Low) 9-Alt L out (-)C_CAN (Low)-bluelink only 10AUX AudioBattery (+)- 11AUX DetectBattery (+)- 12Steearing wheel remote controllerGround- 13Left front door speaker (+)GrounHyundai Accent (HC) (2017 - 2022) Service Manual: Description and Operation
- Function NoItemDescription 1Washer Linked Wiper – If the washer switch is pressed ON for 0.06 second with the vehicle mode in IGN2, the wiper relay is turned ON after washer switch ON, and then the wiper relay is turned OFF after wiper parking signal ON. 2MIST Linked Wiper – If the wiper mist switch is pressed ON for 0.6 second with the vehicle mode in IGN2, the wiper relay is turned ON, and then OFF after wiper parking signal ON.
Contents
- Specifications
- Repair procedures
- Troubleshooting
- Special Service Tools
- Engine And Transaxle Assembly
- Timing System
- Cylinder Head Assembly
- Cylinder Block
- Cooling System
- Lubrication System
- Intake And Exhaust System
Categories
- Manuals Home
- Hyundai Accent Owners Manual
- Hyundai Accent Service Manual
- New on site
- Most important about car