Hyundai Accent (HC): Body (Interior and Exterior) / Interior Trim
Contents:
- Components and Components Location
- Door Scuff Trim
- Cowl Side Trim
- Front Pillar Trim
- Center Pillar Trim
- Rear Transverse Trim
- Luggage Side Trim
- Rear Pillar Trim
- Rear Package Tray Trim
Components and Components Location
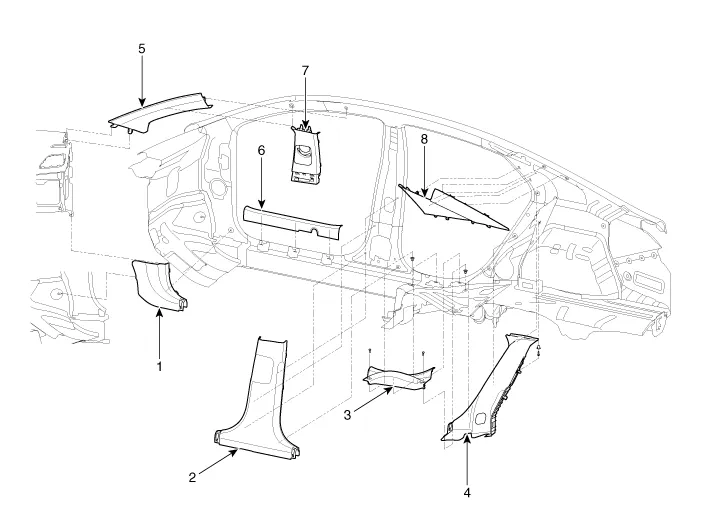
1. Cowl side trim
2. Center pillar lower trim
3. Rear door scuff trim
4. Rear wheel house trim
5. Front pillar trim
6. Front door scuff trim
7. Center pillar upper trim
8. Rear pillar trim
Door Scuff Trim

1. Front door scuff trim
2. Rear door scuff trim
[Front door scuff trim]

‚ÄĘ Put on gloves to prevent hand injuries.

‚ÄĘ When removing with a flat - tip screwdriver or remover, wrap protective tape around the tools to prevent damage to components.
‚ÄĘ When removing the interior trim pieces, use a plastic panel removal tool not to damage the surface.
‚ÄĘ Take care not to bend or scratch the trim and panels.
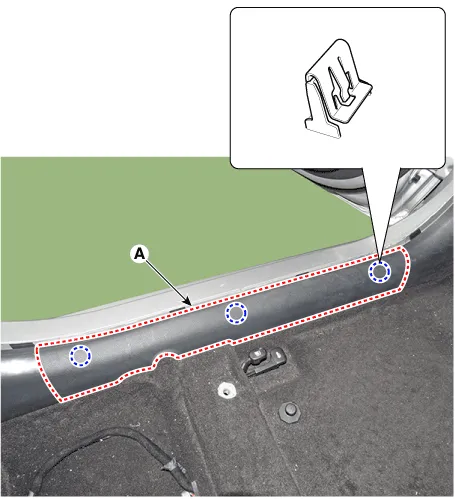
1.Carefully remove the front door body side weatherstrip.
2.Using a screwdriver or remover, remove the front door scuff trim (A).
3.To install, reverse the removal procedure.

‚ÄĘ Replace any damaged clips (or pin - type retainers).
[Rear door scuff trim]

‚ÄĘ Put on gloves to prevent hand injuries.

‚ÄĘ When removing with a flat - tip screwdriver or remover, wrap protective tape around the tools to prevent damage to components.
‚ÄĘ When removing the interior trim pieces, use a plastic panel removal tool not to damage the surface.
‚ÄĘ Take care not to bend or scratch the trim and panels.
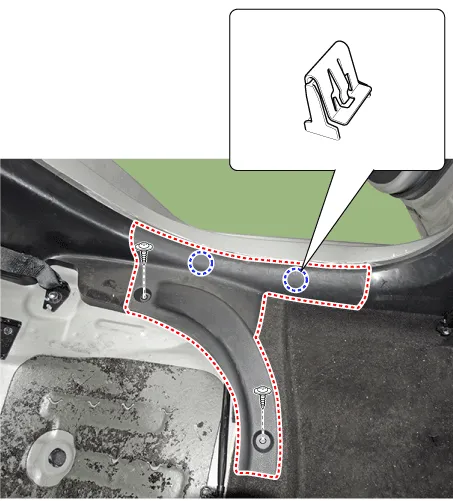
1.Carefully remove the rear door body side weatherstrip.
2.Remove the rear seat cushion assembly. (Refer to Rear Seat - "Rear Seat Assembly")
3.Loosen the mounting screws and remove the rear door scuff trim (A).
4.To install, reverse the removal procedure.

‚ÄĘ Replace any damaged clips (or pin - type retainers).
Cowl Side Trim
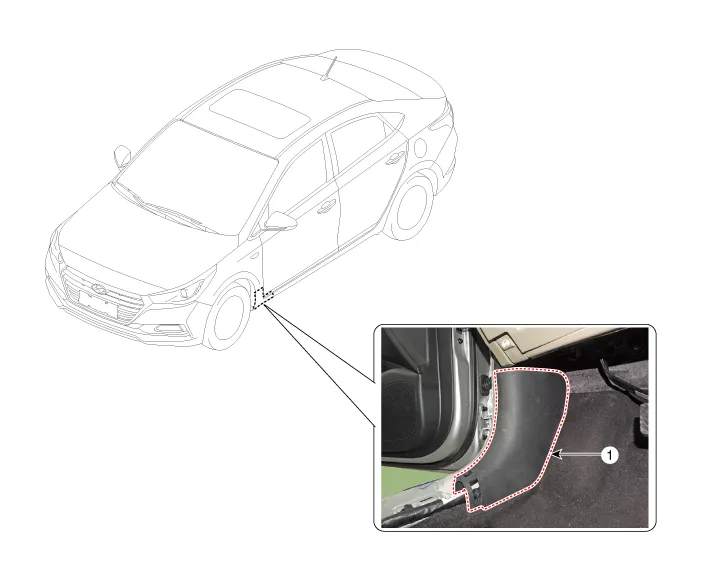
1. Cowl side trim

‚ÄĘ Put on gloves to prevent hand injuries.

‚ÄĘ When removing with a flat-tip screwdriver or remover, wrap protective tape around the tools to prevent damage to components.
‚ÄĘ When removing the interior trim pieces, use a plastic panel removal tool not to damage the surface.
‚ÄĘ Take care not to bend or scratch the trim and panels.
1.Remove the front door scuff trim.(Refer to Interior Trim - "Door Scuff Trim")
2.Carefully remove the front door body side weatherstrip.
3.Using a screwdriver or remover, remove the cowl side trim (A).
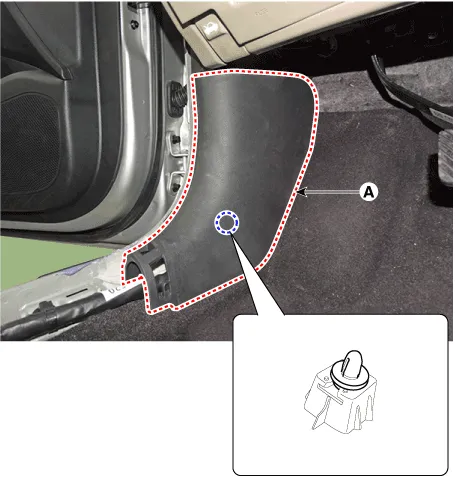
4.To install, reverse the removal procedure.

‚ÄĘ Replace any damaged clips (or pin - type retainers).
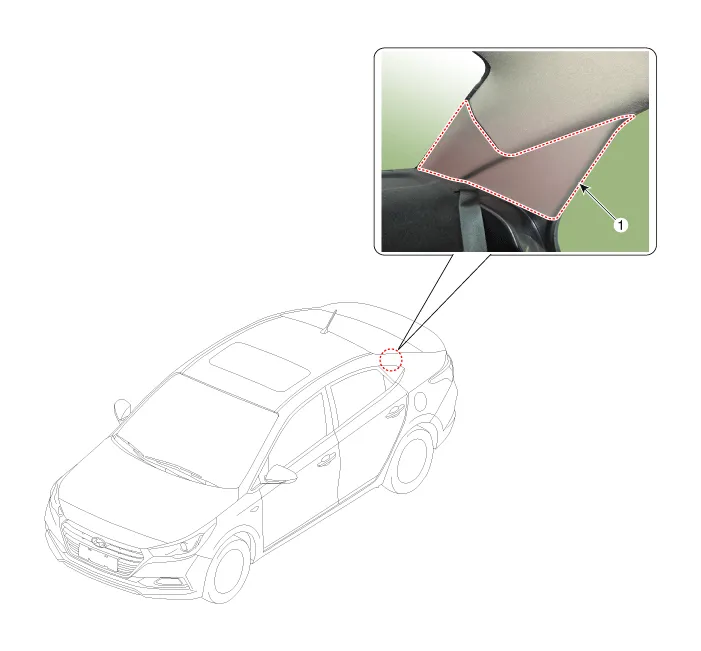
Front Pillar Trim

1. Front pillar trim

‚ÄĘ Put on gloves to prevent hand injuries.

‚ÄĘ When removing with a flat - tip screwdriver or remover, wrap protective tape around the tools to prevent damage to components.
‚ÄĘ When removing the interior trim pieces, use a plastic panel removal tool not to damage the surface.
‚ÄĘ Take care not to bend or scratch the trim and panels.
1.Remove the front pillar trim.
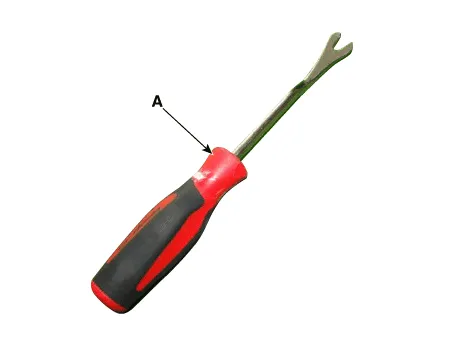
(1)To remove the front pillar trim, the fastener remover (A) below must be used.
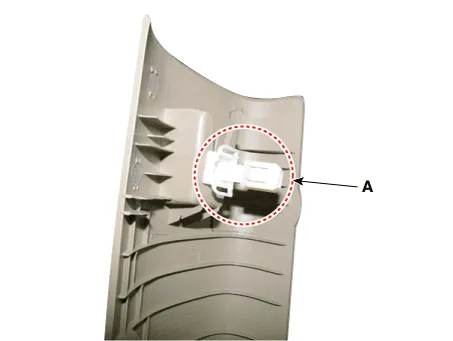
(2)After slightly lifting up the front pillar trim and putting the tool in, remove the mounting clip (A) by pulling it.

‚ÄĘ Be sure to replace the existing clips with new ones when removing or replacing the front pillar trim.
(3)Remove the front pillar trim (A).
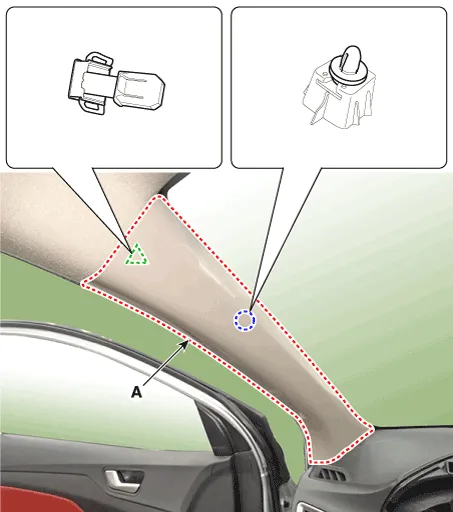
2.To install, reverse the removal procedure.

‚ÄĘ Replace any damaged clips (or pin - type retainers).
‚ÄĘ Be sure to replace the existing clips with new ones when removing or replacing the front pillar trim.
Center Pillar Trim
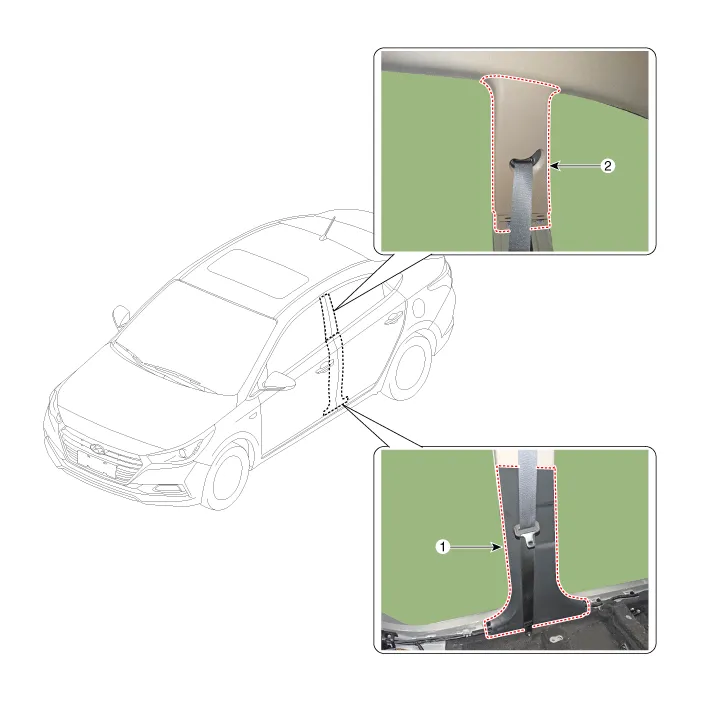
1. Center pillar lower trim
2. Center pillar upper trim

‚ÄĘ Put on gloves to prevent hand injuries.

‚ÄĘ When removing with a flat - tip screwdriver or remover, wrap protective tape around the tools to prevent damage to components.
‚ÄĘ When removing the interior trim pieces, use a plastic panel removal tool not to damage the surface.
‚ÄĘ Take care not to bend or scratch the trim and panels.
1.Carefully remove the front door body side weatherstrip.
2.Carefully remove the rear door body side weatherstrip.
3.Remove the front door scuff trim.(Refer to Interior Trim - "Door Scuff Trim")
4.Remove the rear door scuff trim.(Refer to Interior Trim - "Door Scuff Trim")
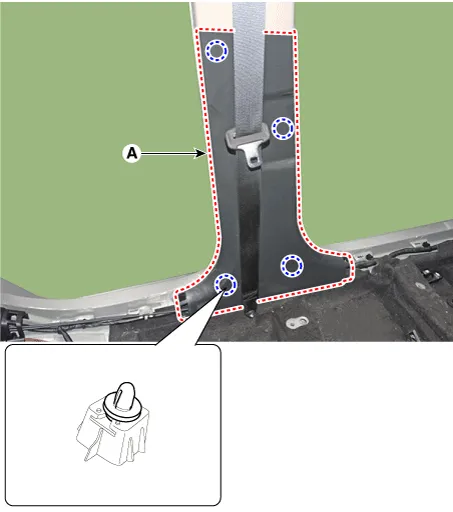
5.Using a screwdriver or remover, remove the center pillar lower trim (A).
6.To install, reverse the removal procedure.

‚ÄĘ Replace any damaged clips (or pin - type retainers).

‚ÄĘ Put on gloves to prevent hand injuries.

‚ÄĘ When removing with a flat - tip screwdriver or remover, wrap protective tape around the tools to prevent damage to components.
‚ÄĘ When removing the interior trim pieces, use a plastic panel removal tool not to damage the surface.
‚ÄĘ Take care not to bend or scratch the trim and panels.
1.Remove the center pillar lower trim.(Refer to Interior Trim - "Center Pillar Trim")
2.Remove the anchor seat belt connector. (Refer to Restraint - "Emergency Fastening Device (EFD)")
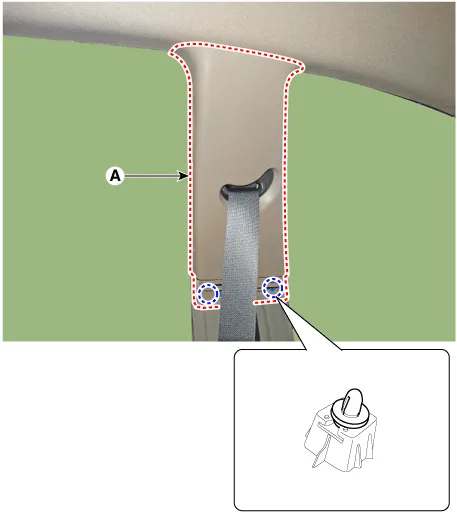
3.Using a screwdriver or remover, remove the center pillar upper trim (A).
4.To install, reverse the removal procedure.

‚ÄĘ Replace any damaged clips (or pin - type retainers).
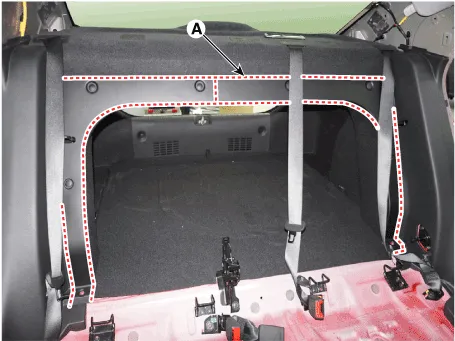
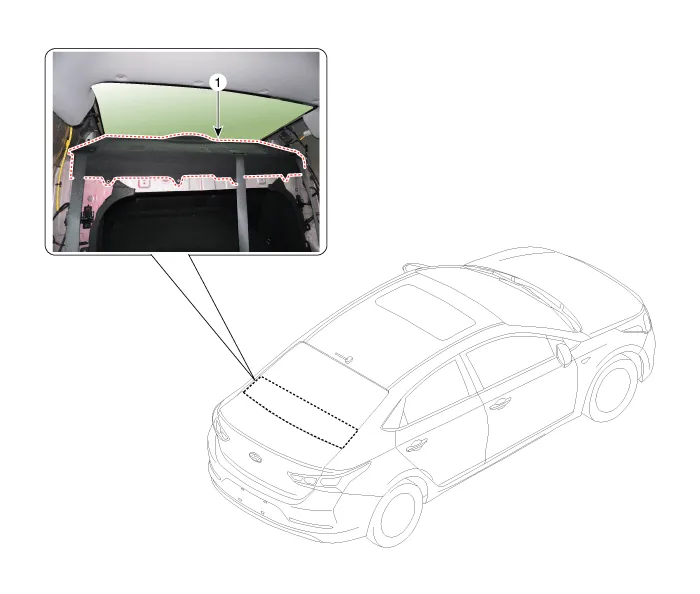
Rear Transverse Trim
![]()
1. Rear transverse trim
![]()
‚ÄĘ Put on gloves to prevent hand injuries.
![]()
‚ÄĘ When removing with a flat - tip screwdriver or remover, wrap protective tape around the tools to prevent damage to components.
‚ÄĘ When removing the interior trim pieces, use a plastic panel removal tool not to damage the surface.
‚ÄĘ Take care not to bend or scratch the trim and panels.
1.Remove the luggage covering met (A).
![]()
2.Loosen the mounting clips and remove the rear transverse trim (A).
![]()
3.To install, reverse the removal procedure.
![]()
‚ÄĘ Replace any damaged clips (or pin - type retainers).
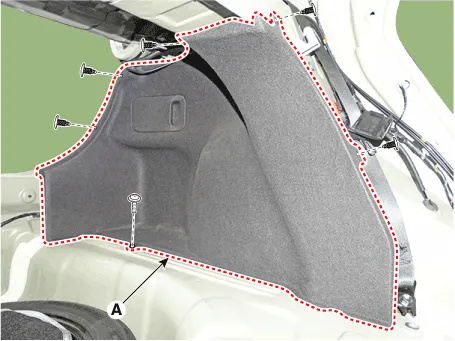
Luggage Side Trim
1. Luggage side trim

‚ÄĘ Put on gloves to prevent hand injuries.

‚ÄĘ When removing with a flat - tip screwdriver or remover, wrap protective tape around the tools to prevent damage to components.
‚ÄĘ When removing the interior trim pieces, use a plastic panel removal tool not to damage the surface.
‚ÄĘ Take care not to bend or scratch the trim and panels.
1.Remove the rear seat assembly(Refer to Rear Seat - "Rear Seat Assembly")
2.Carefully remove the rear door body side weatherstrip.
3.Remove the rear door scuff trim.(Refer to Interior Trim - "Door Scuff Trim")
4.Remove the rear transverse trim.(Refer to Interior Trim - "Rear Transverse Trim")
5.Loosen the mounting clips and screws, remove the luggage partition center trim (A).
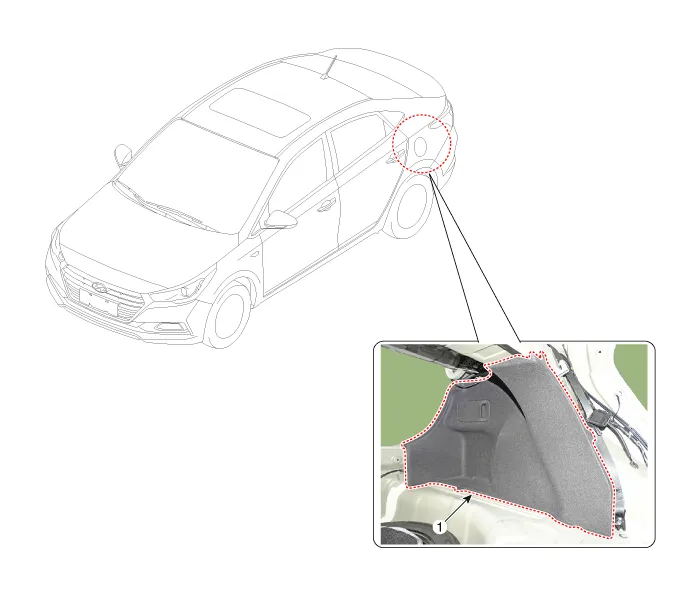
6.Using a screwdriver or remover, remove the rear wheel house trim (A).
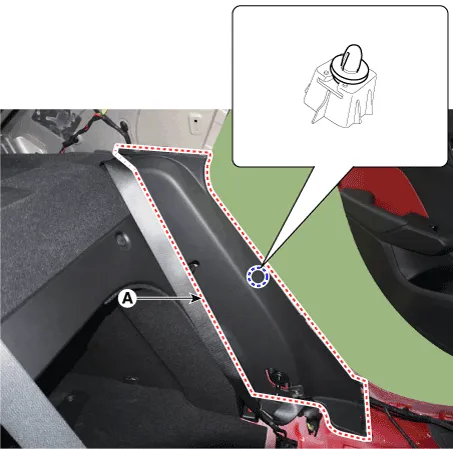
7.After loosening the mounting clips and screws, remove the luggage side trim (A).
8.To install, reverse the removal procedure.

‚ÄĘ Replace any damaged clips (or pin - type retainers).
Rear Pillar Trim
1. Rear pillar trim

‚ÄĘ Put on gloves to prevent hand injuries.

‚ÄĘ When removing with a flat - tip screwdriver or remover, wrap protective tape around the tools to prevent damage to components.
‚ÄĘ When removing the interior trim pieces, use a plastic panel removal tool not to damage the surface.
‚ÄĘ Take care not to bend or scratch the trim and panels.
1.Slighty remove the rear door body side weatherstrip.
2.Using a screwdriver or remover, remove the rear pillar trim (A).
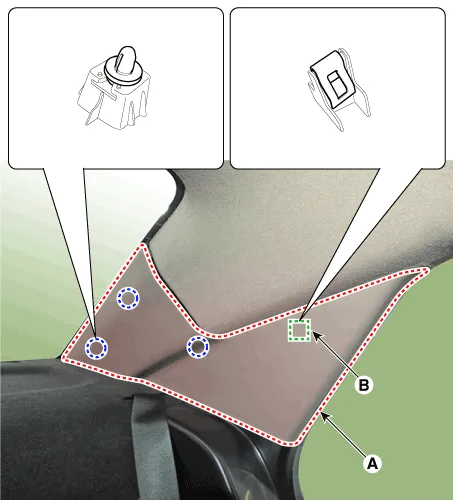
3.To install, reverse the removal procedure.

‚ÄĘ Replace any damaged clips (or pin - type retainers).
‚ÄĘ Be sure to replace the existing clip (B) with new ones when removing or replacing the rear pillar trim.
Rear Package Tray Trim
1. Package tray trim

‚ÄĘ Put on gloves to prevent hand injuries.

‚ÄĘ When removing with a flat - tip screwdriver or remover, wrap protective tape around the tools to prevent damage to components.
‚ÄĘ Use a plastic panel removal tool to remove interior trim pieces without marring the surface.
‚ÄĘ Take care not to bend or scratch the trim and panels.
1.Remove the rear seat cushion assembly.(Refer to Rear Seat - "Rear Seat Assembly")
2.Remove the rear seat back assembly.(Refer to Rear Seat - "Rear Seat Assembly")
3.Slighty remove the rear door weatherstrip.
4.Remove the rear door scuff trim.(Refer to Interior Trim - "Door Scuff Trim")
5.Remove the rear pillar trim.(Refer to Interior Trim - "Rear Wheel House Trim")
6.Loosen the clips and screws, remove the luggage partition center trim (A).

7.Using a screwdriver or remover, remove the rear wheel house trim (A).

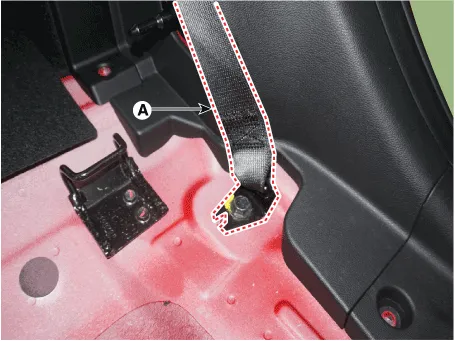
8.After loosening the mounting bolt, remove the rear seat belt lower anchor (A).
Tightening torque :39.2 - 53.9 N.m (4.0 - 5.5 kgf.m, 28.8 - 39.8 lb-ft)
[Side]
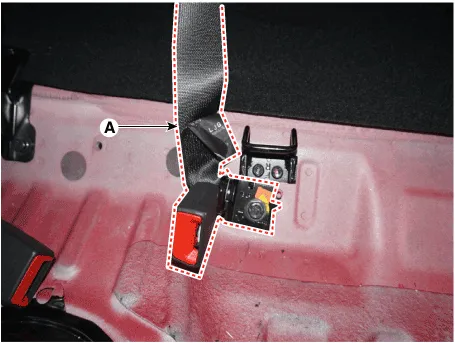
9.Using a screwdriver or remover, remove the center seat belt cover (A).
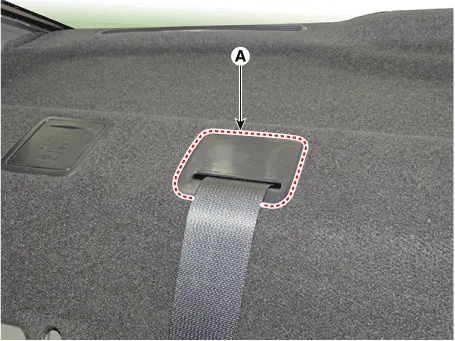
10.Using a screwdriver or remover, remove the package tray trim (A).
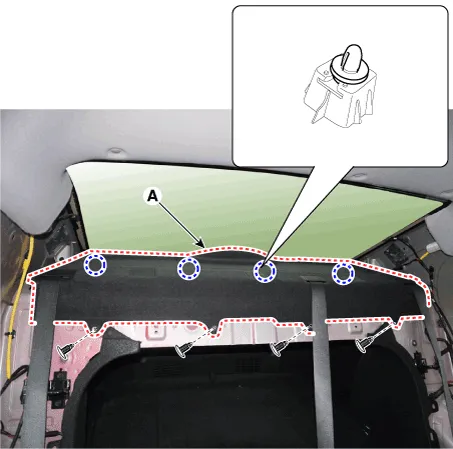
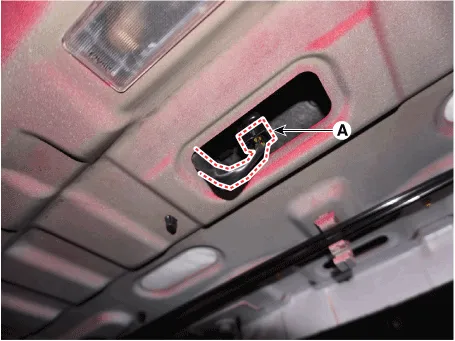
11.Disconnect the connector (A).
12.To install, reverse the removal procedure.

‚ÄĘ Replace any damaged clips (or pin - type retainers).


Other information:
Hyundai Accent (HC) (2017 - 2022) Service Manual: General Safety Information and Caution
- Instructions ‚ÄĘ The R-1234yf liquid refrigerant is flammable gas. The gas reduces oxygen available for breathing and causes asphyxiation in high concentrations. The victim will not realize that he/she is suffocating. ‚ÄĘ Inhalation may cause central nervous system effects and may cause drowsiness and dizziness. ‚ÄĘ Ingestion may cause gastrointestinal discomfort.Hyundai Accent (HC) (2017 - 2022) Service Manual: Exterior Lights
Lighting control To operate exterior lighting on the Hyundai Accent, rotate the knob at the end of the control lever to one of the positions listed below. The available positions may differ by type and equipment. ‚Ė† Type A ‚Ė† Type B ‚Ė† Type C Type A (1) OFF position (2) Parking lamp position (3) Headlamp position Type B (1) OFF position (2) AUTO light position (3) Parking lamp position (4) Headlamp position Type C (1) DRL OFF position (2) AUTO position (3) Parking lamp position (4) Headlamp position Daytime running light (DRL) The Daytime Running Lights (DRL) help other road users notice the front of your Hyundai Accent during daytime driving, particularly in low-angle light after dawn and before sunset.
Contents
- Components and Components Location
- Door Scuff Trim
- Cowl Side Trim
- Front Pillar Trim
- Center Pillar Trim
- Rear Transverse Trim
- Luggage Side Trim
- Rear Pillar Trim
- Rear Package Tray Trim
Categories
- Manuals Home
- Hyundai Accent Owners Manual
- Hyundai Accent Service Manual
- Questions & Answers
- Video Guides
- Useful Resources
- New on site
- Most important about car
- Privacy Policy

0.0118